I'm exhausted. However, much was accomplished. We're progressing a little slower than anticipated, but still doing great. Today we disassembled the front and side windows and sanded sealed, and stained all the pieces; sanded, sealed and stained the 2 remaining pieces of baseboard that are still on the wall, and cleaned up the sawdust mess. All but 2 pieces of baseboard are finished and awaiting the final coats of shellac. Somehow on paper it doesn't sound like we did much, but that was a good 6 hours of work. The woodwork looks fantastic, and I'm getting really excited about how it's turning out.
Tomorrow we're going to a friend's graduation ceremony and my mom's for dinner, so Day 4 will pretty much be a bust. Day 5 Shayne goes back to work, but I will clean up, seal, and stain the headers for the dining room, south window, and west windows, and put on the last coat of wall and ceiling paint. Day 6 I should be able to start putting all the woodwork back on the walls... Christmas is coming...!!!
Showing posts with label woodwork. Show all posts
Showing posts with label woodwork. Show all posts
12/06/2007
For Omar: Staining pine woodwork
A few days ago, Omar of El Paso Foursquare asked, "The woodwork in my home is also pine (fir?). I've had one project already dealing with refinishing and had quite a time getting it to look right. Blotchiness being a major factor. Has the technique you describe to avoid that worked for you?"
The short answer is "yes", but there are some caveats. First, let me describe the technique that I use a bit more thoroughly. I'd like to qualify this by saying that this has worked for me. I'm not an expert (I'd never even done this before last week!), and you may have different results with your project.
I've sanded my woodwork to remove all traces of the original finish, which wasn't in great shape, and to remove all of the stuck-on bits of paint. I finish with 240 grit, then wipe down the boards using a rag dampened with denatured alcohol. I let the boards dry for 30 - 60 minutes, then apply a 1 lb coat of dewaxed clear shellac with a foam applicator. For the first two boards tried to wipe on the shellac, but I couldn't coat it evenly that way, and I ended up with some blotches. In order to prevent that, the shellac must be even. Using the foam brush, I felt that I was putting on too thick of a coat, but it still stained beautifully. I let the shellac dry for at least an hour, then apply the stain. I'm using Varathane golden mohogany and applying it with an old t-shirt. I folded up a section, then dip about .75" into the stain. I sort of "paint" it on, then wipe off the excess with another bit of t-shirt. I let dry for at least another hour, then apply a 3 lb cut of clear shellac over the top.
The result?
I dunno about you, but I think it looks damn good! I'll have to touch up some areas where the paint stuck inside nail holes with some color-matched paint before the final shellacking, but the overall effect is perfect.
11/28/2007
shellac+stain+shellac = perfect
I had no idea how much of a hassle this would be. I figured I'd just buy some garnet shellac, slap it on, and life would be good. Not so much.
The garnet shellac wasn't brown or dark enough. It actually looked very similar to the orange/amber shellac I had tried out in the summer. It added beautiful depth and color to the wood, but it wasn't what I was looking for. So then I bought all kinds of little sample packages of Varathane stain. Sample packs like that are God's gift to DIYers. After much sampling, I've finally decided on "golden mahogany". The absoloutely terrible photo below shows all of my attempts at finding the right color combination. Remind me not to take pictures before the sun comes up and/or I've had some coffee. The top of the right-hand board is the garnet shellac, with the amber shellac beneath it. I imagined garnet as a deep reddish hue, but it's very orang-y. More red-orange than red-brown.

Because our woodwork is pine, it's kind of difficult to stain without it turning out blotchy. Based on some recommendations, I decided to seal the wood first using a 1 lb cut of clear, dewaxed shellac (Zinnser SealCoat, thinned). The stain goes over that, then I coat it all with a coat of garnet shellac to bring out the red tones. And then a few coats of clear shellac over that for protection. Is that complicated enough? The resulting color just about perfectly matches the existing woodwork upstairs, which is what I am aiming for. I'll take a picture when the room has brightened up so that the flash doesn't wash it out.
The garnet shellac wasn't brown or dark enough. It actually looked very similar to the orange/amber shellac I had tried out in the summer. It added beautiful depth and color to the wood, but it wasn't what I was looking for. So then I bought all kinds of little sample packages of Varathane stain. Sample packs like that are God's gift to DIYers. After much sampling, I've finally decided on "golden mahogany". The absoloutely terrible photo below shows all of my attempts at finding the right color combination. Remind me not to take pictures before the sun comes up and/or I've had some coffee. The top of the right-hand board is the garnet shellac, with the amber shellac beneath it. I imagined garnet as a deep reddish hue, but it's very orang-y. More red-orange than red-brown.
Because our woodwork is pine, it's kind of difficult to stain without it turning out blotchy. Based on some recommendations, I decided to seal the wood first using a 1 lb cut of clear, dewaxed shellac (Zinnser SealCoat, thinned). The stain goes over that, then I coat it all with a coat of garnet shellac to bring out the red tones. And then a few coats of clear shellac over that for protection. Is that complicated enough? The resulting color just about perfectly matches the existing woodwork upstairs, which is what I am aiming for. I'll take a picture when the room has brightened up so that the flash doesn't wash it out.
9/08/2007
Progress! (with pictures)
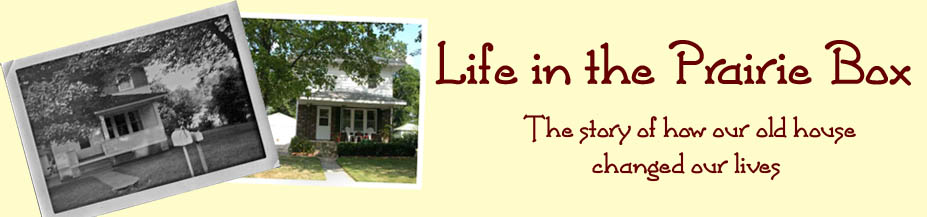
After taking Bach for a long walk this morning, I got busy working on the living room. I decided that the front windows needed to be taken apart in order to do a good job sanding, since the joints were extremely gunked up with caulk and several layers of paint.
I'd already sanded the face of the trim visible in this picture. The other one was still all gunked up with paint residue from stripping. I used my little pry bar to pull off the interior stops (the strips of wood that hold the sash in place, or would if my windows hadn't been retrofitted with new sashes in the late '80s). Each only had 3 nails, and in 5 minutes I had all 6 of them off.
 I hauled them all outside, then scraped the three sides that were originally painted. Because of the way my windows were retrofitted, one of those 3 sides is no longer visible, but scraping the old caulk helped it to fit flush. Within an hour I had all 6 scraped and sanded.
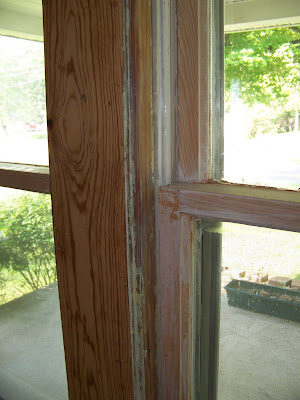
I was hoping to disassemble the window further and take off the trim pieces that separate the windows. I was able to wedge my pry bar in underneath one of them, but it didn't budge. Rather than force it (and probably wreak something), I decided to just sand and scrape them in place.
Since lead paint is an issue with our living room I wore a respirator with special cartridges. FYI, most standard respirator cartridges do NOT work on lead paint. The cartridges that are approved for lead dust and fumes are designated by a purple band and are NIOSH approved. To ensure the respirator is sealed properly around your face, cover the cartridges with your hands and inhale. The mask should pull tight on your face and no air should be coming in. If air leaks in around the edges, the mask does not fit properly and won't protect you from dust or fumes. For your safety, a respirator should be worn whenever you will encounter lead dust or fumes. I made the mistake of stripping lead paint with a heat gun without a respirator and ended up with the mother of all headaches for 2 days. Not very smart. You should also have a vacuum with a HEPA filter to clean up. There are other precautions you may choose to take, and I don't pretend to know everything about lead paint safety. Sand at your own risk!
Another side note... If I ever buy another respirator, it will have a full-face mask. I wore eye protection, but sawdust was flying everywhere so I still ended up with lots of dust in my eyes.
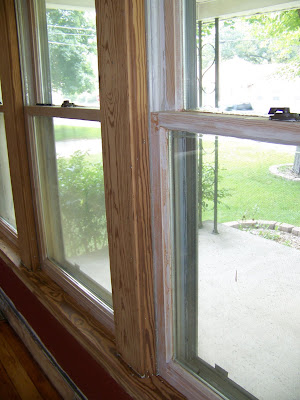
I scraped and sanded the 2 large separator pieces as well as the window sill and trim underneath it. Along with clean-up afterwards, it probably took 2 hours. A lot of the sanding was very awkward, since I had to sand the sides and underside of everything. Not fun for my back, but it looks really nice. Here's my official "after" picture:
There were some spots I couldn't get into with either the sander or scraper. I'll have to figure out something before I stain.
Since the living room was already extremely dusty, I went ahead and started sanding the piece of baseboard that we couldn't remove without ruining the plaster. That looks much better now too! I couldn't finish, since I ran out of sandpaper, but I'm very happy with the progress I made.
11/01/2006
Step One: Remove Head From Sphincter
As much as I don't like to admit it, I think I've been somewhat depressed lately. I can come up with all of the excuses that I want, but the point is that all I've been doing is moping around for the past few months wishing that the house was perfect and didn't need any work. There's been some sporadic activity (I got the basement storage area cleaned and organized, we attacked and reformed a few flower beds in the yard, I reorganized the kitchen, etc), but I've really lost track of where I'm going. This morning, I looked at the living room and thought, "I really like this room. It gets great light all day, year-round, and the floors are beautiful. Why am I not working on finishing it?" And I coulnd't come up with a better answer than laziness and an odd lack of motivation. Maybe I thought if I ignored it long enough, it would finish itself...?
So, I'm finally pulling my head out of my ass. Remember this picture?
So, I'm finally pulling my head out of my ass. Remember this picture?
That's where I need to be.
Friday morning, Shayne and I are going to go to Lowe's to find a stain for the living room woodwork. The amber shellac looked WAY too orange, and even the garnet isn't the color I want. I'm still going to use shellac, but as a finish coat over the stain. I'm trying to match it to the inside of the closet door in the front bedroom, but if I can get close, I'll be happy.
I need to have the living room done by Christmas. I promised myself I could decorate this year. All I need to do is stain/shellac the trim and put it back up. Not a big project. Not a difficult project. Not even a time consuming one.
I think I need a cheerleader. Or maybe a Marine drill instructor...
Subscribe to:
Posts (Atom)