Showing posts with label living room. Show all posts

5/20/2011

"New" prairie-style front door

After languishing in the corner of the living room for about 2 years, my mom paid for the 9-lite, prairie-style front door we had found at the ReStore to be installed.  Our carpenter has turned out to be a bit flaky, and it's been 4 months since he picked up the door to flip the hardware.  But today he came by and installed it!!

I'm so excited.  It just absolutely makes the living room.  The 60's-style door is gone, and the prairie-style door feels like it's been here forever.  I'm especially excited because the carpenter managed to keep the original hardware.  We still need to refinish the door so it matches the woodwork, but for now, I'm ecstatic just to have a door that suits the house.


But boy does it make our screen door look awful....

3/18/2011

Demolition auction score!

A few weeks ago, Indiana University at South Bend (IUSB) had a demolition auction of 30 houses that they were razing to make way for a parking lot.  Almost all of the houses had been used for student housing before they build their current apartments, so they weren't in good shape from a historic standpoint.  But there were some neat features and details that were auctioned off, including woodwork, built-ins, kitchen cabinets, plumbing, and flooring.  I was unable to attend, due to my work schedule, but my wonderful mother went for me.  She scored us a set of built-in cabinets ($165) and a house-full of woodwork ($25).  She also networked with some salvagers who would be happy to sell us anything that they recovered.

Yesterday, Shayne and I went to "our" house (1026 Bellevue) and claimed our built-in bookshelves.  They were ridiculously easy to remove, though they had been banged up a bit by folks who had won other items in the house.  During their removal, I found that the bookcases had originally had lights installed.  We had to rip out the wiring, but the little light fixtures inside are still intact, and we may restore them at a later time.  We also saved some baseboard of an unknown wood species (for some reason I think beech, but I don't know why), but almost all of the doors had so many holes for handles and locks that they weren't worth saving.  There was a neat old closet cupboard that I would have loved to take with us, but we don't have the space to store it.  We also didn't have space in the truck to transport it.  It was BIG.

Salvaging always makes me sad.  I'm glad that we (or someone) is dismantling the houses so that the materials can be reused...  But to see them torn down to make way for a slab of asphalt just seems silly.  I could probably write an entire pity-party post, but I'll spare you all my mental anguish.

When we got home, the original plan was to store the built-ins in the garage for some future house.  Though they were only about 2' wide, they wouldn't fit in the doorway between our living and dining rooms.  But I asked my ever-so-patient husband to bring one of them inside for me, "just to see something."

After a bit of furniture shuffling, we now have two new additions to our living room:

(Please excuse the grainy picture.  The lighting this morning is not the greatest)

It would be ideal if they were twice as wide, but I think they look nice.  To casual observation, you don't notice that they're not part of the room.  I'd center them on either side of the window, but each cabinet has a hole on the side where the doorway woodwork is supposed to fit.  I can just see our cat and baby thinking that they are the greatest new place to hide...

Here's to another bit of rescued house history!

7/29/2009

Stairway progress pics

The weather cleared up, so after work I came home and started staining the staircase.  I did the newel post, railing, "front" of the spindles, and the "front" woodwork/baseboard.  I still have to do the stairs themselves, the "back" baseboard, the other 3 sides of the spindles, and the "cap" of the baseboards that we removed when we repaired the walls 3 years ago.  Still, we've come a long way, and I think it looks great.

Remember before??
I feel obligated to mention that that's before we even bought the house...  That's not our furniture!

A very scary "during" picture from another angle:

During the stripping:

And after sanding (and paint! and floor refinishing!):

And today:
The flash isn't terribly flattering to the color.  Imagine it richer and with more golden tones.  I tried to get one without the flash, but my tripod is AWOL, and I'm not really in the mood to go searching.  Suffice it to say that I'm really happy with how it's shaping up.  It'll look even better once we put the missing bits of woodwork back on.  There are a few spots that are less than perfect, but that happens with any old house project, I think.  I'll also have to get some wood-colored paint to touch up the spots of paint that absolutely refused to budge.  There are also a few spots where the old shellac/stain remains, and the new stain matches just about perfectly.  If you don't know where to look, you'd never notice.
And I remembered the other day that we bought woodwork at the Habitat ReStore that will match what we have and fit around the window at the bottom of the stairs...  Maybe I should start sanding that too.  'Cause woodwork really adds something.  Like making it look like less of a crack house.
I'm so excited!  We may actually finish the entire living room renovation/restoration before I die of old age!

6/14/2009

Why I love my living room

Without a doubt, this room has the best natural light out of any in the house.  My favorite time of day in here is late afternoon/early evening.  It's not bright anymore; there's just a soft, natural light that makes the room feel very cozy.  The gold we chose for the walls enhances the warmth of the room.  I'm so glad we didn't stick with the Roycroft copper red that we had...  With all the windows, it almost feels like you're sitting on the porch.  Now that the futon isn't blocking the windows, there's an even greater connection to the outside, and I can see the tops of the ferns in the bed in front of the porch.  Right now there's hardly any traffic, and I can hear tons of birds singing.   

Looks like the critters like it in here too...

Times like this make me wonder how I'll ever manage to leave this house behind...  When we moved in, this room was straight out of the 80s.  Now, it's like a little Craftsman oasis.  I'm so very happy with the way it turned out.  Just sitting in here, doing nothing, makes me feel so contented.  Everything in this room just screams "home" to me, from the glowing pine floors to the homemade pottery.  I can't wait til the rest of the house is done.  I hope it feels as good as this room does.

In which I finally say goodbye to the Redi-Shades

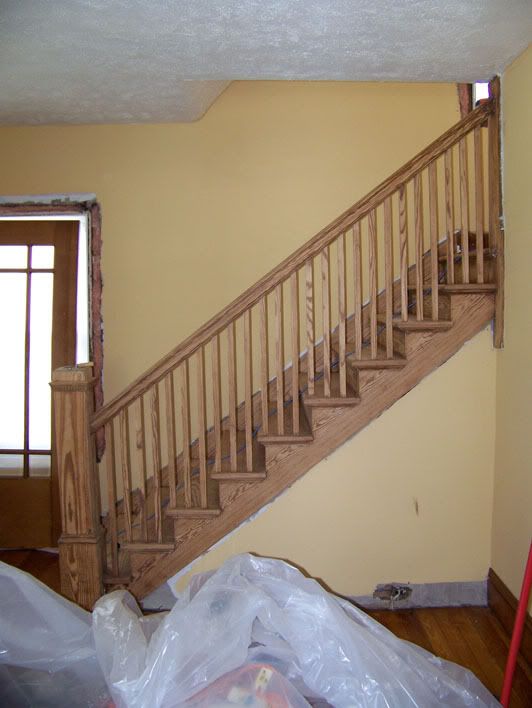
When we moved here almost 4 years ago, one of the first things we I did was to tear apart this living room.  This included the drapes.  For about a year, we lived without window coverings of any kind, but we finally decided we needed some privacy from the neighbors.  Enter the Redi-Shade.  It's a piece of "pleated" paper with double-sided tape at the top and little clothespins at the bottom.  You simply cut them to the width of your window and, voila!  Instant privacy.  They really don't look all that terrible either.  Definitely not the classiest, but nobody walked in the door and said, "Oh my God!  You have paper shades!  How tacky!"  And since nobody did this, I honestly wonder if anyone ever noticed...

But I noticed.  My friend Kendra has a little bungalow that came with these awesome blinds that you could open from the top or the bottom.  I always loved them, but couldn't find any in the stores that would fit our windows without custom ordering.  I was willing to pay for them eventually, but there always seemed to be other priorities.

But one day, while browsing JCPenny.com after looking at someone else's top-down/bottom-up shades that they had bought there, I finally found my shades.  I waited for them to go on sale, then got them for $17 each! 

They finally came in the mail yesterday, and I installed them this morning.  That part was a serious pain in the ass.  The screws that came with the mounting hardware were cheap as heck, and stripped even though I was just using a manual screwdriver.  I finally just used the short screws instead of the long ones, since I don't think anyone's going to be hanging from the shades.  At least I certainly hope not...  Other than that, they were sretty simple and straightforward to install.  One of the things I like is that the hardware is invisible once the shade is mounted.  They don't have that cheap-looking little plastic box on either side like most non-custom blinds.

Then I realized how God-awfully dirty the windows were.  So I washed the 4 living room windows, including the triple track storms.  Most times I hate our replacement windows, but being able to tilt them out for cleaning is a HUGE bonus in my book. 

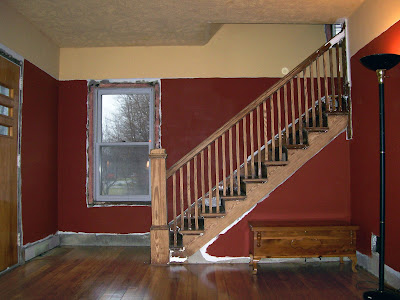
Once the windows were nice and clean, I thought it was sad how much the futon blocked the view of the beautiful triple window at the front of the house.  So I rearranged the living room.  Thankfully the furniture is all on little felt pads, so I could just slide it around the floor.

Since I had to move the area rug, now I was really noticing how dull the floor looked near the dining room doorway.  So I touched up the area with a very light coat of shellac to make it shine again.  Can't do that with polyurethane!

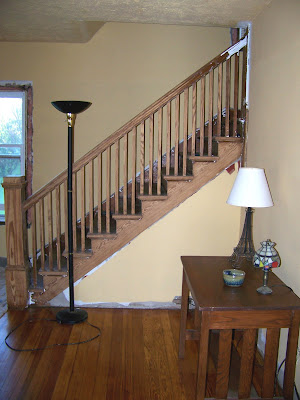
Then I stopped to admire my work and saw that it was good.
Now if we could just get some pictures hung on the walls...

12/12/2008

Finally feels like home

Ever since we bought the house, I've wanted to decorate for Christmas.  The first year we put up a tree and some icicle lights outside.  Then we tore up the living room.  The next year we had the tree in the middle of our crack-house living room.  Last year I finally got my crap together and finished the woodwork.  So we got the tree up the less than a week before Christmas, even though there wasn't much furniture to speak of.

This year, it's 2 weeks before Christmas, and I have a Christmas tree, outside lights, and furniture.  And, the furniture isn't cheap, college dorm stuff either anymore.  YAY!  As I was walking through the room, I realized again how homey it looks now, especially compared to when we bought the house.  Remember??


In the past year, I've acquired the majority of the furniture: a mission style futon frame (which will eventually move to the office or basement family room), two matching victorian-ish bookshelves from my Aunt Virginia and Uncle Chuck, my gigantic arts and crafts bookcase with leaded glass doors, and my bargain basement mission-style rocker.  Tying it all together is the awesome rug that is reminiscent of the arts and crafts period, a leaded glass table lamp, and a leaded glass floor lamp.  And there's the mission style table that I got almost 2 years ago.  Considering how much I adore the room, I'm amazed at how little it cost to furnish it.  All told, the antiques were less than $1000, which proves you can find nice vintage furniture without paying a fortune.  Granted, collectors would probably laugh at my assortment of nameless pieces, but I'm so very happy with the way it's turned out.
It's still not quite done, but soon we'll be hanging pictures and replacing the last few bits of woodwork.  And note to self: find a nice mica lamp and move that damned Eiffel tower lamp somewhere else...

11/13/2008

Retail Therapy

Normally when I'm having a bad day, I find something constructive to do, or I just mope and get it over with. I can't remember the last time I went out and spent money because I felt like crap. Until yesterday.

I bought these:
They're "Les Saisons" by Alphonse Mucha (photo shamelessly stolen from art.com)I've been wanting them for quite a while, and never bought them. Now that we're actually hanging pictures in the living room, I want something vintage-y to go in there as well as our family photos and such. I didn't get the stuck-together group as shown; I bought the individual prints. We'll mat and frame them (Shayne knows how to cut mats - how cool is that?) as a matched set, then hang them somewhere in the living room. I'm excited to get them, so I guess I can understand why people go out and shop when they're sad. For what it's worth, I did also start staining the upstiars doors. They look gorgeous, but no pics yet...

10/20/2008

Two Week Extravaganza: Progress Report

My two weeks didn't go quite the way I had planned.  I accomplished both more and less than I had hoped for.

Here is the list of possible projects to work on:
  1. Finish sanding the stairs
  2. Stain and shellac the stairs
  3. Sand/refinish nursery floor
  4. Have upstairs doors and woodwork stripped
I listed other unfinished projects, but more to show how much we have going than as an actual to-do list.

Here's what I actually got done:
  1. Nearly finished sanding the stairs.  The big hang-up was finding a sander that could get into the crevices and actually do a decent job sanding.  The Skil Octo sander we have just wasn't cutting it.  It works well for a limited number of things, but using any of the tools that extend its reach (the little finger sander and the extended mouse shape) doesn't apply enough pressure to really scrub off old finish.  Towards the end of my two days off I found a Dremel sander that absoloutely kicks butt, but I only had time to use it on 1/3 of the parts that need finished. 
  2. Shellac and stain the stairs.  Obviously this didn't quite get done, since not all the stairs are sanded and ready to go.  However, we did finish the top 5 stairs above the landing.  They're stained, shellacked, and reassembled.  And, I can tell ya, the stairways is going to look awesome if this is any indication.  The little piece of cove molding that goes under each tread hasn't been refinished yet, but I'm sending those to the stripper.  Photos coming soon.
  3. Refinish the nursery floors.  Didn't happen.  I didn't even clean the nursery.  Oh well, I have 7 months left.
  4. Living room windows and upstairs doors.  Haven't made it to the stripper yet.  I'm considering leaving the upstairs woodwork painted, since there's not much natural light in the hallway.  Would dark woodwork close it in?  I'm undecided.
  5. Add final coat of shellac to living room floor.  This one I actually did.  When we bought the bookcase, I knew we were getting too much furniture for the living room to be able to move it all around easily.  So, before the bookcase came home, I added another thin coat of shellac to the floor.  It made it super shiny (I've since learned that the wax in the waxy shellac makes it softer and dirt can get ingrained in it), and it looks great.  Almost like having a new floor (again!)!
  6. Felt sick and demotivated due to hormones.  Ugh.
  7. Was sad and pathetic due to going on light duty at work.  I spent 2 days feeling sorry for myself.  I never realized how much I attached my identity to my job.  I was also upset about going to midnights, but it has worked out well, since I no longer have morning sickness.  Shayne also is on midnights now, so we see each other more.  Note to self: Don't feel sorry for yourself until you know that something isn't going to work out well.
  8. Began fall yard cleanup.  I would have done more, but we have a mosquito infestation in our yard that makes it very difficult to go outside without one of these:
  9. Went for a much-needed hike to Indiana Dunes.  Nothing makes you feel better than slogging 5 miles through sand and up dunes.  Thanks mom!  :)

The bookcase arrives

Amazingly (if you know us, you'll understand why), the bookcase made it home without incident.  Not that I had anything to do with it...  Being pregnant and all, the doctor imposed a 25 lb lift restriction.  25 lbs is an absoloutely pathetically small amount, especially when I'm used to carrying big bags of dog food by myself, but there it is.  I've broken the restriction several times, but Shayne was dead-set against me helping with the bookcase. 

So I didn't.  Armed with our rusty old truck and his friend R, Shayne brought the bookcase home.

I looked much bigger in our living room than it had in the shop window.  It was also taller than I remembered.  The spot I had cleared for it didn't work out, but it fit in beautifully across from the sofa.  I was surpried to find that all 6 shelves were included, even though there had only been 5 when we bought it.  Paul had also given us a key that fit the locks.  And the bookcase is identical to the photo I found on an internet acution site, except that ours is in better shape.  Score!

Before we brought the bookcase home, I was habing doubts about it.  It's a lot of money to spend on a bookcase, and I was afraid it wouldn't be as nice as I thought it had been.  But if anything, it's better.  I feel almost like we stole it, and I'd have probably paid even more for it.  And, even better, it looks wonderful in our living room.  It adds some much-needed character and a bit of not-so-simple beauty.  The curves and leaded glass are a nice counterpoint to the strong mission lines of the rest of the furniture.  Here it is in its new home:
I wasn't planning on filling it immediately, but once it was in the house, it seemed it was just begging to be used.  So, within 15 minutes of its homecoming, I was unpacking books that had been languishing in a rubbermaid tote for nearly 3 years.  It's now full of books that I love, and seems much happer to be being used again (Yes, my furniture has feelings.  Doesn't yours?).
Someday in the future, I'd like to have it professionally refinished, even though the scratches in the finish are much lighter than I originally thought.  For now, though, I'm happy with it just the way it is.  It's the focal point of the living room, which continues to inspire me and remind me what we can accomplish when we get off our butts to do it!

12/16/2007

The living room is DONE!

Well, not quite, but we're down to punchlist tasks like replacing the outlets and outlet covers and touch-up painting. We even have our Christmas tree up (but not decorated yet). I'm also in the process of finding furnishings, as the Eiffel Tower lamp just isn't very Arts and Crafts-y. :) Somehow, probably because this project took so damned long, we managed to forget that the original trim is missing from the window at the bottom of the stairs and on the landing. I have a header for the landing window, but we'll need to either recreate or salvage the rest. Still, even though it isn't American Bungalow material, it looks like a living room, and it feels like home. In celebration, here's a little photo tour.


The living room, as seen from the stairs. New wood futon frame, new mattress cover, old pillows. Gotta work on those pillows, but they'll do for now...


The doorway to the dining room, complete with ornery cat. The walls aren't really 2 different colors, it just looks that way in the photo. Who knows...? The wall with the futon is a good representation of the wall color.


Here's the rest of the wall. My aunt and uncle "donated" the little corner bookshelf (and the matching bookshelf in the next picture), and they fit in perfectly. I love the Eiffel Tower lamp, but it's going to live in the office as soon as I can find a replacement.

Doesn't the front door look awful now? I hated it before, but now that it's up against some nice woodwork... Ugh. I need a bigger wreath.


And, the front window. The header is one of my two favorite pieces of trim. It has a beautiful grain pattern, but I can't get a better picture of it until I have my tripod. We got paper shades from the Home Depot. After 2 years, I was finally tired of everyone who drove by getting a peek into the house. I like my privacy.

Now if only we weren't terrified to hang pictures on the walls...

12/08/2007

Sneak Preview 2 (and a wee bit of Before and After)

I wasn't supposed to work on the house yesterday, but I did. There I was, already dressed for the graduation, crawling around on my hands and knees staining woodwork. I need help... But look what else I accomplished!


None of the woodwork is attached to the wall in this photo, except for the bottom portion of the baseboard, which never came off. There will also be a separate block at the bottom of the door frame, but it's not done yet. I'll also be getting the green paint (looks white in photo) off of the edge of the door frame, since it just doesn't go with the room...

I can't even begin to describe the amount of satisfaction I'm feeling as this room nears completion. I honestly haven't been this excited since we bought the house. I never thought the living room would look bad when I was done (else why do it at all?!), but it's been such a long project that I definitely felt hopeless at times. It seemed like we'd NEVER finish. I didn't take very good "Before" pictures in some cases, but here's a little reminder of what the door trim, walls, and floors looked like 2 years ago:


We're come a long way, baby!

12/06/2007

The 7 Day Blitz: Day 3

I'm exhausted. However, much was accomplished. We're progressing a little slower than anticipated, but still doing great. Today we disassembled the front and side windows and sanded sealed, and stained all the pieces; sanded, sealed and stained the 2 remaining pieces of baseboard that are still on the wall, and cleaned up the sawdust mess. All but 2 pieces of baseboard are finished and awaiting the final coats of shellac. Somehow on paper it doesn't sound like we did much, but that was a good 6 hours of work. The woodwork looks fantastic, and I'm getting really excited about how it's turning out.

Tomorrow we're going to a friend's graduation ceremony and my mom's for dinner, so Day 4 will pretty much be a bust. Day 5 Shayne goes back to work, but I will clean up, seal, and stain the headers for the dining room, south window, and west windows, and put on the last coat of wall and ceiling paint. Day 6 I should be able to start putting all the woodwork back on the walls... Christmas is coming...!!!

12/05/2007

The 7 Day Blitz: Days 1 and 2

I took this week off work to try to get the living room done before Christmas. So far so good!

Yesterday was Shayne's b-day, so we only put in about 2 hours of work. I finish-sanded the trim for the door and stripped the header. I also stripped the headers for 2 of the windows. They'd already been stripped with the heat gun, I just used the chemical goo to clean them up. Shayne stripped most of the inside of the doorway between the living and dining rooms with the heat gun.

Today I prepped and stained the trim that goes around the front door. My plan was to finish the trim around one opening to see how I liked the color. While I did stick to that plan, I would have done more if I'd been able to. The color is exactly what I wanted, and it looks great. The lamp-lit pics didn't turn out well, so I'll try to get some up tomorrow. We also finished stripping the doorway and prepped the other trim pieces for stain. About halfway through the day I got a ferocious headache, so I wasn't as productive as I'd hoped. Still, we're making good progress and everything but the stairs will be finished by next week.

11/28/2007

shellac+stain+shellac = perfect

I had no idea how much of a hassle this would be. I figured I'd just buy some garnet shellac, slap it on, and life would be good. Not so much.


The garnet shellac wasn't brown or dark enough. It actually looked very similar to the orange/amber shellac I had tried out in the summer. It added beautiful depth and color to the wood, but it wasn't what I was looking for. So then I bought all kinds of little sample packages of Varathane stain. Sample packs like that are God's gift to DIYers. After much sampling, I've finally decided on "golden mahogany". The absoloutely terrible photo below shows all of my attempts at finding the right color combination. Remind me not to take pictures before the sun comes up and/or I've had some coffee. The top of the right-hand board is the garnet shellac, with the amber shellac beneath it. I imagined garnet as a deep reddish hue, but it's very orang-y. More red-orange than red-brown.


Because our woodwork is pine, it's kind of difficult to stain without it turning out blotchy. Based on some recommendations, I decided to seal the wood first using a 1 lb cut of clear, dewaxed shellac (Zinnser SealCoat, thinned). The stain goes over that, then I coat it all with a coat of garnet shellac to bring out the red tones. And then a few coats of clear shellac over that for protection. Is that complicated enough? The resulting color just about perfectly matches the existing woodwork upstairs, which is what I am aiming for. I'll take a picture when the room has brightened up so that the flash doesn't wash it out.

10/23/2007

I'm Cheating...!

I can't decide if I'm ashamed or relieved. I made a call earlier to a local refinishing shop to get an approximate quote for stripping some of my baseboards. Not the flat, easy part, but the little 2" strip of intricate design. I want the living room done by Christmas, and I just don't have the time or inclination right now to do it all myself. There's right around 50 feet of it, and the price he quoted me is reasonable (I'll post more details once the work is finished). It was just a ballpark figure, but we can afford it, and I so badly want the room finished. Two years is too damn long.

I can't help feeling like I'm a quitter though. Granted, I've done a LOT of the work myself, and the focal point of the room, the stairway, will be all my own work. I was just hoping to be able to say that we did it all... There's just not enough time this year with my job change, and training, and both of us working full-time.

Someone, please tell me I'm still a real do-it-yourselfer...!

9/30/2007

More fun with living room paint

I continued my painting spree this morning, and I put a second coat of paint on the living room walls and a first coat of "craft white" on the ceiling. I just can't get over how much brighter and warm the room feels now. Red is classified as a warm color, but something about the copper red made it sort of dreary and depressing. I didn't really notice how dark it was until it wasn't anymore. Stupid, I know, but whatever. I guess I'm a little slow that way. Here are some more pictures. Please ignore the ugly futon and the little stuffed moose.

I'm still going to put one more coat of gold on the walls and one more on the ceiling, but that will be next weekend's project...

Painting the Living Room: Redux

I finally decided that the Roycroft copper red just wasn't what I wanted, so I took my 2 gallons of hubbard squash gold back to Sherwin-Williams and had it shaken up so I could repaint. I only got one coat on yesterday afternoo0n, but the difference is amazing. And, best of all, I'm happy with it. In less than 2 hours, the living room went from this:

To this:

The bright gold just opens the room up and will really show off the woodwork. It feels a little pumpkin-y right now, since the ceiling is still gold as well (soon to be Valspar's Eddie Bauer Bungalow craft white), but I'm thrilled with the way it's turning out. I like the copper red, but I was never comfortable with it. From day one, I wasn't sure if I was really happy with it. Note to self: If you don't immediately love it, it ain't gonna work.

4/17/2007

Isn't it ironic.... Don'cha think?

Instead of the predicted 2-3 week wait, the rug arrived today. The pad isn't here yet (??), but that's the least of my concerns right now. Of course, being as patient as I am, I dragged it into the house, ripped off the plastic, and spread it out on the living room floor. And, somewhat surprisingly, I like it. Even more surprising, is that it looks good with the red and gold walls that are currently in the living room. It also looks good with the gold walls upstairs. So now I'm going to have fits again over the colors.


The wall colors never show up quite right in the photos... I think it has something to do with the flash washing it out. Both colors are much richer in person, and the "hubbard squash" is more golden and less yellow. The rug in the second pic looks almost exactly like it does in real life, though. It's a little too green in the first one. Maybe tomorrow I'll try the pics with a tripod and timer instead, to see if I can get it right.

I'm really surprised that the rug doesn't look bad with the red, which is almost what I had hoped for. It would make the wall color decision much easier! I think I'm still leaning towards "hubbard squash" or a "caramel"-type color for the walls.

More to come in the morning...