7/31/2006

Collateral Damage of Renovation/Restoration: Scaring the Neighbors

I'm starting to feel bad for our neighbors. Before we moved in, there was a very nice, tidy couple with a baby that lived in the Prairie Box. They planted some flowers in containers on the porch, kept the grass mowed, did some minor work on the house, and lived a nice, typical suburban life. I'm sure that they were universally beloved.

And then we came along.

Now the grass is long and weedy, and the planter boxes on the porch are neglected and empty. Every few weeks, a large pile of rubble appears at the curb, containing everything from carpet to 2 by 4s to curtains. We stay up til 4 am sanding and hammering. They have to wonder what the hell we're doing over here, especially since it was such a "nice house" to begin with. It's not like the Prairie Box was one of those neglected, forlorn homes that the neighbors are thrilled when you start fixing it up. Our house wasn't the eyesore of the neighborhood. To most eyes, our house was fixed. I'm seriously waiting for someone to come over and ask exactly what we're doing to this poor house.

Speaking of what we're doing to the house... I was supposed to go camping on my days off this week, but due to the extreme heat (and never-ending to-do list) I decided it would be best to stay home. I haven't accomplished too much yet, but I did get a second coat of shellac on the living room floor. Finally. With the addition of the second coat, it's starting to get a nice, uniform shine. It was a little shiny with one coat, but only on the dark part of the grain pattern. Don't know why. I'll put a third coat on tomorrow and see how much glossier it gets. I don't want it to be mirror-shiny, but it needs to be more uniform than it is now.

Here's what I'm hoping to accomplish on my next 2 days off:
  • Finish the floors - completely
  • Sand woodwork (weather permitting)
  • Declutter the dining room and office

I also need to find a way to get the paint off of the living room windows. The genius second owner painted them without sealing them, so the paint is damn-near impossible to get off. The only thing I've found that works is paint thinner and lots of elbow grease. Each window will take at least an hour, but I won't be able to work on them until the weather cools off a bit.

7/23/2006

No more leaky garage roof!

When the second owner of our home took on a project, he never, ever did it right. I haven't found a single addition, repair, or remodel that wasn't screwed up in some way. The third owners told Shayne and I that they had fixed some of Owner #2's weirder additions to the home, but I have my doubts. From what I can tell, they painted the paneling in the dining room, put down Pergo over the hardwood, covered the floors in two of the upstairs bedrooms with polyurethane without stripping first, and skimcoated the walls in the master bedroom and little front bedroom (Hey! One out of four ain't bad!). In 5 years, I don't consider that a whole lot, especially considering the really obvious weirdness and damage they left unfixed. In their defense, I'm pretty sure that they updated the electrical and HVAC, so I don't suppose I can complain too much.

One of the biggest unfixed items was the addition connecting the "new" 1950s garage to the original garage. The connector had a flat, shingled roof, and looked to have leaked for about 10 years. At some point, that special second owner had realized that a flat shingled roof was an invitation for leaking, especially since he hadn't bothered with any flashing, and had tarred over the whole thing. It began to leak again, probably in the mid 1990s. The third owners must not have been too bothered about a leaking roof, and simply let the water damage and rot continue unimpeded. We spent the winter with a tarp jury-rigged between the three roof pitches, and probably prevented the roof from collapsing under a heavy snow or ice load. Now that summer had come, it was time to fix the roof once and for all.

Shayne started off Friday afternoon by demolishing the old roof. The whole process, including cleanup, took mayber 3 hours. The wood was so rotten, it basically just fell down in defeat when he threatened it with the crowbar.

Saturday morning, our friend Randy came by and helped Shayne sister the framing around the doorways and in the connector walls, frame a new roof, and shingle it. Our new connector roof has about a 6" drop over 2.5 feet, which is shallow, but water flows down without pooling. The reason they had to keep the pitch so low is because they had to work under the 24" overhang from the original garage but still make it high enough to walk through on the inside. Three people can stand on it, so it's plenty sturdy.

I don't have any pictures, since I was busy shellacking the floor while they were working, but I'll post some soon.

7/22/2006

A floor to be proud(er) of

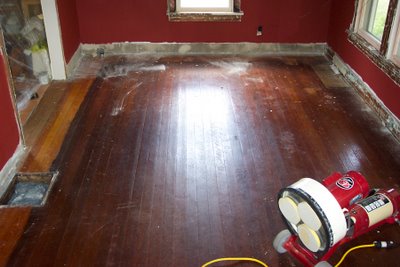
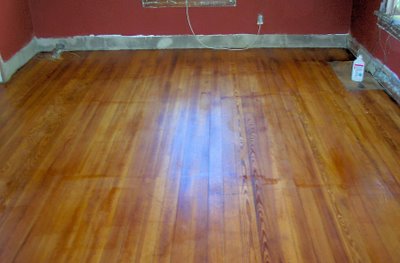
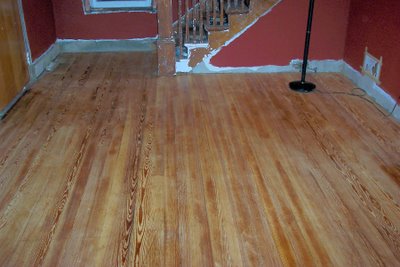
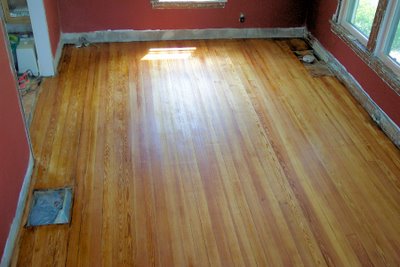
The floor has gone through quite a transformation this week. We went from this:
To this: Back to this:
And finally, to this: We're not done yet, but the first coat of shellac went on beautifully this time. No problems. Of course, it also helps that I did it right... This time around, I used clear shellac. For every 2 cups of 3lb cut I used, I added 1/2 cup of denatured alcohol to thin it. I also made sure to spread it as smoothly as possible from one end of the board to the other (lengthwise). I only did 3 boards at a time this time, and I instead of using the lambswool applicator on the pole, I got down on my hands and knees so I could monitor the coverage more closely. I think that the results speak for themselves, but the floor looks so much better than it did before that I can hardly believe it. The far left side in the picture is still wet, which is why it looks a little darker than the rest of the floor, but everything is a uniform golden color with no splotches or thick spots. The only flaw is a deep scratch that runs the width of the floor, right in the middle of the room. It didn't show up well in the above picture, but it's pretty noticeable in person. I sanded the hell out of it, but it was so deep that it didn't help much. Once we have a rug, though, it should be less visible.
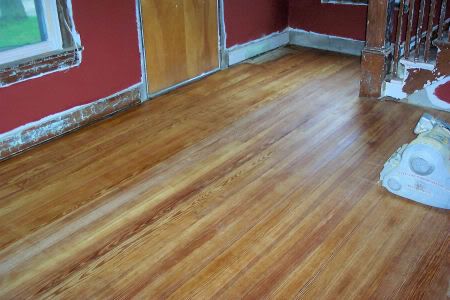
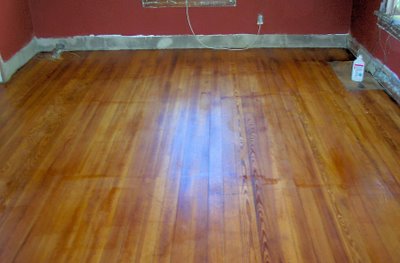
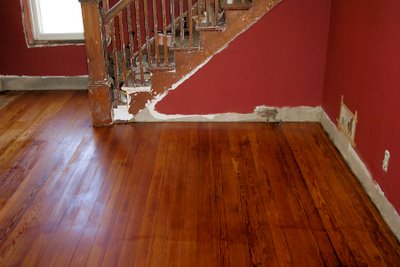
Later today I plan to put on another coat of shellac, this time one-third amber and two-thirds clear. I'd like the floor to be just a little darker and less yellow, but I don't want to lose all the bright happiness of the clear coat. After the second coat, I'll add a third coat of thinned clear before I wax. That should be another adventure, since I've never waxed a floor before in my life. Whee...

I really can't express enough how thrilled I am that the floor turned out this well. After having to re-sand the floors, I was terrified that I'd just ruin them again. I agonized over whether I should just give up the whole shellacking thing and just polyurethane them like everyone suggested. Shayne was supportive of whatever I decided, so long as I would be happy with the results. Everyone else said that the shellac was a bad idea and poly was the way to go, except for my best friend Diana. In the end, I followed my gut and my ideals instead of following the crowd, and I'm so glad I did. The poly-ed floors upstairs just don't have the warmth and natural look that the shellacked floor does.

7/20/2006

Sanding the Floors, Part II

Due to my really crappy shellacking, I decided to start from scratch. Again. This time, I did it right. We rented a drum sander and truly leveled out the floor. The drum sander is a totally different beast than the Medusa-like orbital sander, but once I got going I was fine. It was the getting going that was the problem.

Shayne picked up the sander from the rental place and deposited it in the living room. After showing me how to load the paper, he left for work. Alone with the scary machine, I warily turned it on. Loud, but no problems. I started to slowly push it forward while rocking it down to contact the floor. Disaster. The second the drum hit the floor, the sandpaper exploded and flew everywhere. I quickly turned off the machine and went to assess the damage. The floor was a little shredded, but since I was moving, it was a line and not a gouge. I got a new sheet of paper, reloaded, and tried again. This time, I moved about 12" before the paper exploded off the drum. Since I was already afraid of the drum sander (due to the horror stories I'd heard about it runnning away and ruining floors), the fact that it kept exploding at me only made matters worse. My floors were ruined, the sander wouldn't work, and I'd have to get wall-to-wall carpet to hide my damage. In light of those revelations, I did what any self-respecting, modern woman would do: I burst into tears of frustration and went to hide upstairs.

I came back down about 30 minutes later, after reading about the SL-8 sander on the internet. Supposedly, if the cams that hold the paper are not tight enough, the paper will break. I gingerly loaded another sheet of 36 grit paper, tightened the cams fully, put in earplugs, and turned the sander on. The Exploding Paper Monster was vanquished, and a purring tiger was left in its place.

I had heard horror stories about gouged floors and uncontrollable sanders, and I feel obligated to say that, if you use it properly, it's very easy to use and control. Aside from my paper explosions, which were completely preventable, the sander is a tame beast. It doesn't pull like I expected (I could contol it with one hand, even though I used 2), and the only gouge I got was when I sneezed with the sander moving along the floor. It hardly uses any sandpaper at all compared to the EZ-V. I used 6 sheets for the whole room, including the 2 that I ruined. Total rental cost was under $50. Guess what sander I'll be using next time?

After sanding, I wiped down the floor with mineral spirits and prepared to re-shellac. This time, I used a thinned down coat of clear, and I only applied it to 9 boards in case it was horrible. I applied it to 3 boards at a time, moving with the grain, and coating the whole board at one time. Here are the results:
9 shellacked boards
The 9 shellacked boards are little darker than the natural wood, but not too much. The color variation is due to the floor, not the shellac (thank God!). I'll still be adding a coat or two of amber over it, but it's a nice start...

7/15/2006

Beetle juice

I woke up at 8:30 this morning to return the floor sander to K Wood Products, which is the hardware nearest our house. We kept it under $175 in rental fees and sandpaper, but just barely. The gentleman that works there (possibly the owner) is going to start looing for picture rail molding for me, which is awesome. They have a sample on their board of woodwork that they stock, but he said that because it's not that popular, they didn't reorder when they ran out. Hopefully I'll be hearing from them soon.

We didn't get to bed last night until after 2 am. We wanted to get the first coat of shellac on the floor so that it could dry overnight. It didn't turn out perfectly, but I'm satisfied with it so far. We'll need to put on at least one coat of amber shellac, then use clear as "build coats". Even with just one coat, the floor has a nice sheen and color. It's still a little too yellow for my taste, but the second coat thould take care of that. The only bad part is that there are lap marks and slight unevenness where I had to refill the applicator. There are more towards the south end of the room, where I started, than at the north end. I think at the beginning, I was putting it on too thin, and it dried while I was refilling the applicator. Towards the north end, I started to be a little more generous with the shellac, and there are fewer lap marks, and the color is richer. I've tackled a few spots with denatured alcohol and steel wool, and the color has smoothed out, so now it's just a matter of doing that everywhere there's a mark. I'd better go get some kneepads...

South end

North end

Surprisingly, we didn't have too much sawdust floating around. The sander did an excellent job of picking up its dust, so almost all of the mess was from the little orbital sander. I think that next time, I might get brave and rent a drum sander, but overall I'm satisifed with how everything has turned out.

In case you're curious about the title, "beetle juice" is Shayne's name for shellac. It doesn't sound quite so glamourous that way, but it is accurate, since shellac is made from the secretions of the female lac beetle. The resin is then harvested off of trees, supposedly without harming the beetle.