I'm almost done!!! All that's left to do is stain the landing and the baseboard caps (which are sitting in the dining room), then shellac the whole thing.
I never thought I'd get here.
And it even looks good!
Showing posts with label stairway. Show all posts
8/02/2009
7/29/2009
Stairway progress pics
The weather cleared up, so after work I came home and started staining the staircase. I did the newel post, railing, "front" of the spindles, and the "front" woodwork/baseboard. I still have to do the stairs themselves, the "back" baseboard, the other 3 sides of the spindles, and the "cap" of the baseboards that we removed when we repaired the walls 3 years ago. Still, we've come a long way, and I think it looks great.
Remember before??
I feel obligated to mention that that's before we even bought the house... That's not our furniture!
A very scary "during" picture from another angle:
During the stripping:
And after sanding (and paint! and floor refinishing!):
And today:
Remember before??
I feel obligated to mention that that's before we even bought the house... That's not our furniture!
A very scary "during" picture from another angle:
During the stripping:
And after sanding (and paint! and floor refinishing!):
And today:
The flash isn't terribly flattering to the color. Imagine it richer and with more golden tones. I tried to get one without the flash, but my tripod is AWOL, and I'm not really in the mood to go searching. Suffice it to say that I'm really happy with how it's shaping up. It'll look even better once we put the missing bits of woodwork back on. There are a few spots that are less than perfect, but that happens with any old house project, I think. I'll also have to get some wood-colored paint to touch up the spots of paint that absolutely refused to budge. There are also a few spots where the old shellac/stain remains, and the new stain matches just about perfectly. If you don't know where to look, you'd never notice.
And I remembered the other day that we bought woodwork at the Habitat ReStore that will match what we have and fit around the window at the bottom of the stairs... Maybe I should start sanding that too. 'Cause woodwork really adds something. Like making it look like less of a crack house.
I'm so excited! We may actually finish the entire living room renovation/restoration before I die of old age!
7/24/2009
Stairway of the Damned Revisited
John the handyman came over as promised on Wednesday morning at about 8:30 am. He was still there when I got home from work at about 3:15 pm, just finishing his clean-up. I know it would be difficult to mess up sanding flat pieces of wood, but I was still nervous about what I would find. I have control issues with people working on my house; I'm going to be terrible with babysitters!
But I didn't need to be worried. The stairway is fine, and I've only found maybe 3 spots that could use some touch-up sanding. We'll knock that out this weekend, and we should have a fully refinished stairway within a few days. It was definitely worth $150 to save myself 7 hours of work and untold pain and aggravation. Poor John, though. I don't think he'd agree to this project if I asked him again... Not that I blame him!
I'm more nervous about finishing the stairway that I've been about any other project. Thankfully, I've worked out a "system" for refinishing, and I know a lot more about staining and shellacking than I did when I first started sanding the stairs. But it's just so BIG. It takes up an entire wall in the living room and is extremely visible. If it doesn't look good, it will ruin the whole room. Yikes. I'm also nervous because the top 5 stairs that we disassembled and refinished look sort of orange-y. I'm not sure if it's the lighting on that part of the stairs, since the wood there is the same as the wood everywhere else in the house and I used the same method to refinish it... But if I end up with an orange stairway, I'm going to cry. A lot. I think I'm going to test the color on one spindle and one tread to see what it looks like. It would be strange to switch stain colors halfway through a project, but I just want to be sure it's right. I couldn't take having to sand it all down again.
So... Stairway touch-up sanding tonight or tomorrow afternoon, then sealing and staining on Sunday. Wish me luck!!
7/22/2009
Cheater, cheater...
But since I'm 7 months pregnant, I figure I'm entitled to cheat just a little bit...
One of my pet projects has always been the staircase. I used the heat gun to strip all the paint off the newel post, banister, and spindles, then sanded all of the little intricacies. It took forever. So long, in fact, that I lost motivation for a while. Then a LONG time later, I came back and sanded the treads, baseboard, and vertical pieces. That also took forever. And since I only had a random orbit sander at the time, I left little triangular spots of unsanded wood in all the corners as well as between each spindle. Other than that I am finished, but have no inclination to sit hunched over with a sander for several hours doing touch-up work. I wasn't all that motivated before I got pregnant, but now it's even worse. I just want it done.
So... On Monday night I was with my mom at a friend's house when I remembered that the friend's husband is a handyman. He built the framing over the old hall closet opening in the office. And he did a very nice job. So I asked him whether or not he would be willing to sand the remainder of my staircase. He agreed and said he'd be there Wednesday morning.
I feel slightly guilty for putting this project off on someone else, but I also feel very liberated. I'm in full baby-preparation mode, so I've been taking on some odd projects instead of the ones I should be doing. I spent most of Sunday afternoon removing every single item from the kitchen cabinets, wiping down the cabinets, and then completely reorganizing the kitchen. Shayne said I need to put up signs so he'll know where everything is now. I'm also repainting a cheap little wooden bookshelf and dresser for the baby's room. Honestly, just keeping up with the general housecleaning is something of a chore now since I'm tired most of the time, and anything I can get done on top of that is just a bonus. Still, I feel like I'm busting my ass every spare moment and especially on weekends. So, in the interest of FINALLY finishing a project, I'm cheating. :)
By the time I get home from work tonight, we should have a completely sanded staircase...!!! Time to go buy some more "golden mahogany" stain and clear shellac!
10/20/2008
Two Week Extravaganza: Progress Report
My two weeks didn't go quite the way I had planned. I accomplished both more and less than I had hoped for.
Here is the list of possible projects to work on:
Here's what I actually got done:
Here is the list of possible projects to work on:
- Finish sanding the stairs
- Stain and shellac the stairs
- Sand/refinish nursery floor
- Have upstairs doors and woodwork stripped
Here's what I actually got done:
- Nearly finished sanding the stairs. The big hang-up was finding a sander that could get into the crevices and actually do a decent job sanding. The Skil Octo sander we have just wasn't cutting it. It works well for a limited number of things, but using any of the tools that extend its reach (the little finger sander and the extended mouse shape) doesn't apply enough pressure to really scrub off old finish. Towards the end of my two days off I found a Dremel sander that absoloutely kicks butt, but I only had time to use it on 1/3 of the parts that need finished.
- Shellac and stain the stairs. Obviously this didn't quite get done, since not all the stairs are sanded and ready to go. However, we did finish the top 5 stairs above the landing. They're stained, shellacked, and reassembled. And, I can tell ya, the stairways is going to look awesome if this is any indication. The little piece of cove molding that goes under each tread hasn't been refinished yet, but I'm sending those to the stripper. Photos coming soon.
- Refinish the nursery floors. Didn't happen. I didn't even clean the nursery. Oh well, I have 7 months left.
- Living room windows and upstairs doors. Haven't made it to the stripper yet. I'm considering leaving the upstairs woodwork painted, since there's not much natural light in the hallway. Would dark woodwork close it in? I'm undecided.
- Add final coat of shellac to living room floor. This one I actually did. When we bought the bookcase, I knew we were getting too much furniture for the living room to be able to move it all around easily. So, before the bookcase came home, I added another thin coat of shellac to the floor. It made it super shiny (I've since learned that the wax in the waxy shellac makes it softer and dirt can get ingrained in it), and it looks great. Almost like having a new floor (again!)!
- Felt sick and demotivated due to hormones. Ugh.
- Was sad and pathetic due to going on light duty at work. I spent 2 days feeling sorry for myself. I never realized how much I attached my identity to my job. I was also upset about going to midnights, but it has worked out well, since I no longer have morning sickness. Shayne also is on midnights now, so we see each other more. Note to self: Don't feel sorry for yourself until you know that something isn't going to work out well.
- Began fall yard cleanup. I would have done more, but we have a mosquito infestation in our yard that makes it very difficult to go outside without one of these:
- Went for a much-needed hike to Indiana Dunes. Nothing makes you feel better than slogging 5 miles through sand and up dunes. Thanks mom! :)
9/27/2008
Home Improvement Extravaganza: Day 4
Here are a few photos of the disassembled stairway:
After the photo, Shyane vacuumed out the dirt and nastiness from the lath. It's much less scary looking now, and all of the visible wood has been sanded with coarse paper. I need to go over it with 120 grit, then 220 grit.
Yesterday, I sealed the pieces in preparation for stain. I had some errands to run, so I didn't make as much progress as I had hoped for. We're having a family dinner at our house today, but I'd like to get the last little bit of sanding done on the upper stairs, then seal them and maybe even stain. Thankfully, the only other chores I have to do is to wash the dining room floor and clean up the kitchen a bit, so I should have plenty of time.
I am going out of town tomorrow to see my grandma, so the projects are on hold until Wednesday. Just so y'all know I'm not slacking, I'm just not here. Maybe Shayne will get more sanding done while I'm gone...
9/25/2008
Home Improvement Extravaganza: Day 3
Ugh, I'm beat. Starting around 1 pm, Shayne and I finished sanding the baseboard-type woodwork on the laft side of the stairs. Then we disassembled the 5 stairs above the landing so that we could do a thorough job sandinf them as well. All 5 treads, what Shayne calls "kickboards" (the vertical pieces between each step), and the baseboard on each side are all ready for sealant and stain. We burned through a TON of sandpaper, since there was so much old shellac and carpet adhesive that the stripper didn't remove. I even scraped each piece with a carbide scraper, but it was still slow, tough going. But the top portion of the stairway is pretty much done.
We wasted some time trying to figure out if it would be worthwhile to disassemble the bottom portion of the stairs. I've been against this from the start, but Shayne (correctly) pointed out that we'd be able to do a much more thorough sanding job. We couldn't figure out how to get the banister and newel post apart (thankfully), so the stairs stayed intact. I was worried he'd figure out how to get them separated, and then we'd never get it all back together! It's a bigger pain in the butt to sand this way, but I think it would be a bigger pain to reassemble the railing, newel post, and all 30 spindles.
Right now the 5 top treads are just resting on the risers, and the top one is really wobbly. I covered the treads with towels to keep them clean and protected. I also have to stand on the top step when the dogs go up and down to prevent them from freaking out. I'm using the baby gate at the top of the stairway when we're upstairs to keep the dogs from charging downstairs without me. With my luck, I'd end up with a dog falling through the basement stairway's ceiling...
I'm going to seal and stain the top 5 stairs tomorrow so we can reassemble them before we have a disaster...!
9/24/2008
Home Improvement Extravaganza: Day 2
Yes, I know that today should really be day 4. Day 1 I spent catching up on housework; I spent most of last week in Minnesota for a class, plus it was time for some serious fall cleaning. I did some major vacuuming (including moving every piece of furniture), washed floors, and did piles of laundry. Fun times. I still need to go through my closet and get rid of clothes I no longer want, but that's a fairly quick and painless process.
Day 2 was my social networking day. I went out to lunch and then dinner with girl friends I haven't seen in ages. And after spending most of my work days and personal time with guys for the past few months, I seriously needed some female bonding!!
Yesterday I finally got to work on the stairs. I spent about 2 hours actually sanding, but maybe 3.5 hours on the project overall. This included 15 minutes breaks every half hour or so, since the respirator puts dents in my face otherwise. Still, it was nice not having sawdust snot afterwards. Even when I use a dust mask, I still manage to inhale quite a bit of dust. The respirator completely prevented dust inhalation. The stairway went from this:
To this:
And after I took that picture, I finished up the last two vertical bits at the top of the stairs, then started sanding the woodwork at the lefthand side of the stairs. I'm sure it has a name, but I have no idea what it is. I also sanded around the bottom of the newel post a bit to clean it up.
It's coming along, but slowly. Today my back hurts from all the strange contortions I have to make to be able to sand and see what I'm doing. If our stairs had been less solid, I'd have happily taken them apart. Thing is, the railing doesn't even budge when I lean on it, and I don't think I could put it back that way. So I'm stuck doing sanding yoga...
Today I'm feeling lazy. I'll work on the stairs in a little while, but I just don't want to.
8/20/2008
Stairway of the Damned: Progress!
On Monday night, Shayne and I had a little sanding party. The treads of the bottom 10 steps (we have 16 total) are sanded. He bought a pad sander last night to get the vertical parts, since the 5" disc is too big to fit, and the little mouse sander takes FOREVER. I don't have any pics, since as soon as we finished sanding, we covered the stairs with a dropcloth to protect them. I'm disproportionately pleased with myself for making some kind of progress... :) We'll be going on vacation soon, but I think the bottom portion of the stairway will be completely finished within a month.
When we sanded this time, I rigged up a plastic dropcloth to keep the dust out of the nearly-finished living room area. I'd been eyeing a ZipWall, but I think they're overpriced at $110 for 2 poles. While perusing Amazon, I found these 3rd Hand poles. The 3rd Hand poles aren't as light, and they sound like they're a little fussier to use, but at $70 for a 2 pack, I don't really mind. Plus, they can be used to hold up shelves, molding, or cabinets. Each pole can support up to 150 lbs! I used them to pin my plastic sheeting to the ceiling without any trouble. It did a great job of containing the dust, and I wish I'd have invested in them a lot sooner. Like when we were sanding the drywall compound skimcoat... All I need now is one of those nifty zippers that you attach to a slit in the plastic so that I don't have to take my barrier down to get through it.
8/18/2008
Motivated - in all the wrong directions
Now that the office is pretty much prepped and waiting for skimcoating, I've been anxious to start on something new. The stairway still needs to be finished, but I'd honestly rather do anything but sand stair treads, even though the hard part (the spindles and railing) is finished. As I wandered through the house yesterday, I contemplated tearing down the paneling in the dining room. Or ripping up the laminate floor. The POs said that pine floor underneath is in good shape, but needs to be patched where some old, large heat registers used to be. I get so tired of looking at the laminate... And then I remembered that two rooms torn up is Shayne's limit, and in the interest of preserving our marriage, I left the dining room alone. For now.
I went outside and took out some of my pent-up aggression on the "veggie garden". It was honestly more of a crabgrass jungle. Two hours later it was weed-free and ready to be turned into a patio. Of course a couple of coworkers saw me outside working and stopped by to say hi. Why doesn't anyone ever come over when I've just stepped out of the shower? Instead, I was unshowered, sweaty, probably smelly, and covered in dirt from my elbows and knees down. Sigh.
In my defense, I did finally do some work onthe stairs. And this morning, I got up and covered the little cove molding pieces in Citristrip. The rest Shayne and I can just sand. If I don't find something else to distract me first...
11/21/2007
Stairway of the Damned: Part IV
I am finally done with the banister and spindles. Finally. I still have a bit to do on the newel post and the piece where the banister meets the wall (is there a technical term for that bit?), but the back-breaking part is over. Finally. I wish I could sound more enthusiastic, but mostly I'm just relieved. This project brings new meaning to the word "tedious".
Something I am excited about it the shellac. I bought a package of garnet shellac from Rockler, and I mixed up a batch a few days ago. I think it's kind of a misnomer that they're called shellac flakes, though. Mine looked more like glass chips and took 2 days to dissolve completely. I'm testing it out right now on a spare board, and I'll post some pics when I've got a few coats on.
Another bit of excitement is the woodwork came back from The Strip Shoppe less than a week after I dropped it off. 85 board feet in 6 days. That guy is my hero. When we picked it up, he had cleaned off the backs as well as the fronts, and packaged them up neatly in 3 bundles. They don't even need to be sanded. I think the $280 was money very well spent, and I'll be sending more business his way soon.
4/14/2007
Stairway progress photos
I thought I had posted these the other day, but evidently I forgot... For any interested parties, here are photos of the stairway as it stands right now.


It looks a bit nicer in the photos than in person, but progress has been made. A lot of it has been on the side of the spindles facing the wall and facing the other spindles. I'm so excited to be nearly finished. I'll definitely be working on it on my next days off.
Another thing I forgot to post about was my bargain lamp. I found it at a store than was going out of business, marked $49.99, reduced from $139.99. I offered the clerk $40, and she accepted. It might not stay in the living room, but it was a great deal!

And lastly, I ordered the rug. I received an e-mail saying we should have it in two to three weeks, which is good. By then, I should be finished sanding...
4/12/2007
Stairway of the Damned (Part 3 of a Never-Ending Saga)
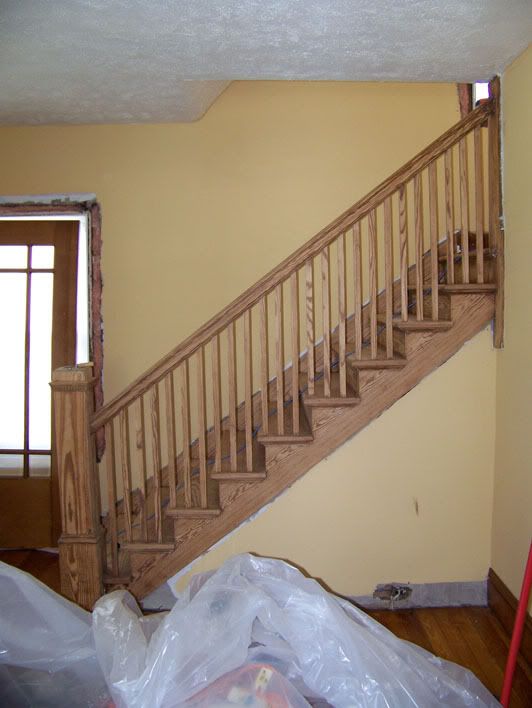
Stripping the staircase is one of those projects that I know will completely change the character of my home. Multiple layers of glossy white paint just didn't do the woodwork justice, and the molding is more complex than I had initially thought. Once it's finished, it will be the focal point of the living room. Once it's finished... Somehow, in my typically optimistic fashion, I didn't realize what a huge, tedious, chore this would be. It's also one of the most rewarding experiences I've had with the house. I'm taking something ugly and making it beautiful again.
Unfortunately, I can't work on the stairway for more than maybe 4 hours in a day. Holding the sander or scraper at the angles required is torture for my back, and I have to take frequent breaks. Should anyone out there in the blogosphere decide that the years of paint on their staircase is unbearable, I'd definitely recommend either hiring a professional or disassembling the banister and spindles. We couldn't afford a pro, and our railing doesn't wobble at all, so I was afraid that if we took it apart, it wouldn't go back together as sturdily. I'm not even sure how to take it apart. The only nails that I've seen simply hold on the inverted quarter-round under each riser. There are no nails or other fasteners visible anywhere else. Talk about good constuction...
I probably have about 12 hours of work left on it, so it's possible for me to finish before summer... I only have 3 spindles left (12 sides), the area under the railing between the spindles, and the inverted quarter-round molding under each tread (16). The flat parts of the risers and the baseboard will be much simpler.
I think I've finally settled on a color palette for the living room.
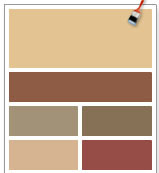
Ironically, I'm using the same colors as before, just in different quantities and places. I still love the Roycroft Copper red, it's just too overwhelming to use on the walls. It will be an accent color instead. The Hubbard Squash or a golden tan (top or lower left) will most likely be the wall color. The brown will be the sofa. The green will be the secondary color, and will probably be found in the rug.
I did find a rug that matches the palette, and Shayne and I both like it. It even looks a bit Arts and Crafts-y. It's from the "Kharma" collection by Oriental Weavers Sphinx. I don't know yet if I can find it locally, but there's a store online that I can order it from and have 30 days to return it in case it doesn't work out. We'd have to pay return shipping, but Shayne has a friend that works at FedEx that can hook us up. The local place only gives 48 hours, and I'm not sure that we can make a decision that fast...

I also found a couch that would work with everything. I think we're going to go with an apartment sized sofa, since we're happy with the size and scale (if not aesthetics) of the futon we currently have in there.
So... Maybe the living room is finally going to come together. I've never decorated a room from the ground up before, and it's nowhere as easy as I anticipated. Usually I have at least one thing to match to, but we started from scratch with this one. No furniture, no wall color, no rug. I now know that if this whole law enforcement thing doesn't work out for me, I'm NOT going to go into interior design!
Unfortunately, I can't work on the stairway for more than maybe 4 hours in a day. Holding the sander or scraper at the angles required is torture for my back, and I have to take frequent breaks. Should anyone out there in the blogosphere decide that the years of paint on their staircase is unbearable, I'd definitely recommend either hiring a professional or disassembling the banister and spindles. We couldn't afford a pro, and our railing doesn't wobble at all, so I was afraid that if we took it apart, it wouldn't go back together as sturdily. I'm not even sure how to take it apart. The only nails that I've seen simply hold on the inverted quarter-round under each riser. There are no nails or other fasteners visible anywhere else. Talk about good constuction...
I probably have about 12 hours of work left on it, so it's possible for me to finish before summer... I only have 3 spindles left (12 sides), the area under the railing between the spindles, and the inverted quarter-round molding under each tread (16). The flat parts of the risers and the baseboard will be much simpler.
I think I've finally settled on a color palette for the living room.

I did find a rug that matches the palette, and Shayne and I both like it. It even looks a bit Arts and Crafts-y. It's from the "Kharma" collection by Oriental Weavers Sphinx. I don't know yet if I can find it locally, but there's a store online that I can order it from and have 30 days to return it in case it doesn't work out. We'd have to pay return shipping, but Shayne has a friend that works at FedEx that can hook us up. The local place only gives 48 hours, and I'm not sure that we can make a decision that fast...

I also found a couch that would work with everything. I think we're going to go with an apartment sized sofa, since we're happy with the size and scale (if not aesthetics) of the futon we currently have in there.
So... Maybe the living room is finally going to come together. I've never decorated a room from the ground up before, and it's nowhere as easy as I anticipated. Usually I have at least one thing to match to, but we started from scratch with this one. No furniture, no wall color, no rug. I now know that if this whole law enforcement thing doesn't work out for me, I'm NOT going to go into interior design!
8/10/2006
The Stairway of the Damned, Part II
A few months ago, I posted an entry about the difficulties of stripping the stairway. It's not the stairs themselves but the railing, balusters, and newel post that are the problem. Space is tight, crevices are plentiful, and some of the finish had worn away before they painted, making the paint a pain to remove. If I could dismantle the whole thing, it would be much easier, but since it's so solid, I don't want to even try. I'm afraid that it would wobble after we put it back together. That, and I'm not even sure how it would come apart. There are no nails that I can see.
Maybe it's time to suck it up and buy some Peel Away...
Subscribe to:
Posts (Atom)