12/30/2006

Apartment Therapy: Week 2

Now that Week 1 is completed, here's my assignment for Week 2:

  1. Fix one thing in my home myself
  2. Clean the kitchen from top to bottom and throw away old food
  3. Buy a water filter and use it (we have well water that is taste-free, so no filter is necessary)
  4. Run my hands over every wall in the hosue
  5. Clear space for an Outbox
  6. clear one surface utilizing the Outbox
  7. Buy fresh flowers
  8. Determine our style
  9. Find a new recipe and cook one meal at home

The assignments are getting harder...! :)

Apartment Therapy Progress Report: Week 1

I'm feeling very motivated and proud of myself. Week 1 was a success, and I managed to complete all of the tasks assigned. I just bought the flowers last night, but I hadn't been to the store all week (unusual for me), and I didn't want to make a special trip. All of the floors were vacuumed at least once, and most got it at least twice due to German Shepherd tumbleweeds. There's no such thing as shedding season with that dog, it's just a year-round thing. I already use earth-friendly cleaning supplies, but I bought a fresh stock of some of the things I've been running low on. I also asked Maggie at 1901 House for a recipe for homemade laundry detergent. I have a large box for Goodwill that I will drop off tonight after work. Sitting for 10 minutes in a part of my home I don't usually sit in was difficult. Our house isn't that big, and I use it all nearly every day. Instead, I substituted a walkthrough of the entire house, taking time to study each room and figuring out what its strengths and weaknesses are. I also brainstormed for improvements. Here's what I came up with, starting at the bottom.


Basement storage/utility room
  1. not enough shelves
  2. too many boxes of furnishings and other items that are not ever used
  3. one full wall of wasted storage space
  4. kitty litter out in the open
  5. items from previous owners must go (paint cans galore)!
  6. love the high ceilings
  7. walls and floors in good condition
  8. nook under stairs perfect for additional shelving
  9. lots of light for a basement

Basement family room

  1. cluttered!
  2. not enough storage for Shayne's electronics projects
  3. need shelving or storage solution for DVDs and CDs
  4. needs new carpet
  5. excercise machine takes up lots of space and is rarely used

Kitchen

  1. need recycling/trash area to be better organized
  2. junk accumulates on top of microwave
  3. good counter space
  4. probably the most organized room in the house

Dining room

  1. "Drop Zone" for mail, shoes, uniform items and work supplies
  2. cluttered by living room furniture and furnishings
  3. needs curtains
  4. HATE the wall color - repaint ASAP as a temporary fix
  5. excellent light

Laundry room/bathroom

  1. Small and cold (or hot in summer)
  2. lots of storage, but unorganized and poorly utilized
  3. need solution for dog food bags
  4. need curtains

Living room

  1. needs to be finished!
  2. love the wall colors
  3. beautiful wood floors
  4. lots of natural light

Office

  1. least favorite room in the house
  2. need new cushion for papasan chair or bring in futon to use for guests
  3. new bookcase/armoire for books, magazines, and office supplies
  4. wallpaper MUST GO!

Bedroom

  1. need headboard and coordinating furniture
  2. new fan/light fixture
  3. drab wall color (very light sage/tan/gray) that I hate
  4. built-in shelves give extra storage
  5. needs more decoration to feel cozy

Spare bedroom

  1. catch-all room with lots of clutter
  2. used as ironing center
  3. AWFUL wall color (bright yellow with green trim)
  4. might work well as a utility room

Bathroom

  1. needs ventilation fan
  2. tons of storage
  3. small but organized

I was surprised to find that only 1 thing in the house needs repair (the furnace ignition works sporadically), and I found 2 light bulbs that are burned out.

I've been motivated this week to start organizing. I bought a magazine file to keep in the bathroom, since both of us usually take something to read while we take baths or if we plan on spending a little time in there. There was a small pile that moved between the floor and the counter, and it's now neat and orderly. I don't really like having reading material in there, but since it ended up there anyways, I might as well make it look as nice as I can! I also cleaned and organized my nightstand, which was pretty scary. Shayne and I are both making an effort to pick up after ourselves and not leave anything laying around that shouldn't be. Training ourselves to new habits will take some time, but I'm so sick of the clutter...

12/23/2006

Apartment Therapy: Week 1

Here's my assignment to myself for week 1:

  1. Make a complete list of repairs and solutions
  2. Vacuum and mop all floors
  3. Remove one item from your home and put it outside (Goodwill for me)
  4. Buy fresh flowers
  5. Sit for 10 minutes in a part of your home that you never sit in
  6. Look into earth-friendly cleaning products (I already use them, due to our septic situation)

Today will start with a thorough cleaning and a house tour. As I clean, I'll make notes about what I like and dislike about each room and what purpose I'd like it to serve.

More later!

Apartment Therapy: The Quizzes

After being inspired by the Apartment Therapy going on over at The Litter Box House, I decided to start a little of my own. Shayne and I agreed to work on one room at a time, but nothing in the house feels right anymore. The renovation/restoration has squashed any hint of comfort or style in the entire house, even in the basement family room. I've known there was a problem for quite a while, but thought it would get better once the living room was out of the dining room. It didn't. Even though one room is destined to be a mess, there's no reason not to make the rest of the house as comfortable and inviting as possible. So today I started with the Quiz...

Favorites

List your favorite in each category:
Actress: Keira Knightley
Actor: Ralph Fiennes, Russell Crowe
Artist: Michael Whelan
Writer: Melanie Rawn, Stephen King, Terry Goodkind
Music: Classical (Bach), swing/big band, country
Restaurant: The Vine, The Chocolate Cafe
Automobile: pickup truck, Jeep Wrangler
TV Show: NYPD Blue, The Shield
Clothing (designer or store): Eddie Bauer, NY&Co

How would you describe your style (3 words)?
1. earthy
2. simple
3. functional


Personal History

Where have you lived?
Where you were born: Dearborn, MI
Where you grew up: Riverview, MI and Mishawaka, IN
As an adult: Mishawaka, South Bend, and Lydick, IN

Whom would you consider a role model?
My mother and grandmother, my friends, my uncle Chuck

What 3 adjectives describe the qualities you admire in this person (perople)?
Honest, hardworking, high integrity


Apartment

What is the problem with your home?
1. Clutter
2. Lack of storage in bedrooms
3. Not enough furnishings

If your home could speak, what would it say is the problem?
"Too many layers on top of the original surfaces keep me from expressing my true self. The clutter hasn't helped..."

What one thing would you like to do or do more of in your home?
Entertain small groups of friends

8 weeks from now, when this project is done, if friends came to visit, how would you like them to describe your home (3 words)?
1. Inviting
2. Cozy
3. Warm


The above questions are designed to illustrate my personal style and aspirations, which seem to me to be mostly in harmony with each other. I do have tendencies towards fantasy (Michael Whelan, Melanie Rawn, Terry Goodkind), but even those somewhat embrace my core values of simplicity and integrity. Stephen King and The Shield show that I have a bit of a dark side... Overall, I like simple elegance and high functionality. Maybe I should work on having some things around that are purely decorative? There's also nothing particularly feminine about my answers. Aside from NY&Co, you probably couldn't even tell that the answers came from a female. Hmm.

There is also a second quiz designed to assess the "health" of your home. I scored in the low end of the "healthy" range, but I feel personally that my home fits more into the "weak" bracket. Especially since it refers to energy drain, which the house definitely does. It also talks about problems being put off for some time, which I have. Nothing needs repair, but I'm definitely a procrastinator on the cosmetic end of things.

I've decided to do the deep treatment, since some of the rooms need ore help than others. It focuses on cleaning and decluttering (which definitely needs to be done) and sets out an 8 week schedule designed for a 1 bedroom apartment. Since my home is obviously much larger than that, I think I may allot myself some extra time on some weeks, but I'll try to stick as closely as possible to the 8 week plan.

12/11/2006

Fun with toxic chemicals

I started really working on refinishing the staircase today. A lot of it is going to be hand sanding, so I bought a couple packages of sanding sponges so that I can get in the corners and concave profiles of the woodwork. I'm excited about working on the house again, and that's good. The living room is overwhelming at times, because there's no little projects to work on. Everything is BIG. Lots of walls, lots of windows, lots of floor, lots of woodwork, and the staircase...

This morning, I sanded the banister and about half of the newel post. Right now, I'm waiting for the toxix paint stripper to finish its job on the underside of the banister and some of the molding on the newel post. Once those little areas are stripped, it's all sanding. I'm really excited; the living room really will be done around Christmas!

As a take-it-easy project after the living room is done, I'll be repainting the small front bedroom. The walls and ceiling in there are already done, and there isn't much woodwork, so that will only take a short time. Then the office will be next while we save up for the bathroom. I'm trying for a promotion at work, and if I get it we'll be able to hire someone to do the plumbing and tile work in the bathroom a lot sooner than we were planning. ::crosses fingers:: It would be so strange to actually HIRE someone to work on the house and just watch as it gets done in a month or so!

12/04/2006

You may have noticed a distinct lack of pictures lately... It's actually not because I haven't been doing anything, it's because my camera broke. I don't know what the problem is, but it will not turn on. The lens is stuck extended, and the camera is completely unresponsive to new batteries, hitting, and swearing. Maybe Santa (or Shayne) will get me a new one for Christmas...?

As far as progress goes, I've been working on cleaning up the living room windows and woodwork for sanding/staining. I've been doing some training at work, so I've been busy, but I'll have six days off starting next Sunday, and I've vowed to spend those days working on the house. It's not too late to be done in time for Christmas!

12/03/2006

Interior Decorating Advice Needed

This is our inspiration picture for the living room:
Yes, I know it's a dining room. But those are the colors that now grace the walls in our living room. Our pine floors are about the same color as the ones shown in the picture, and the woodwork, should we ever get it stained, will be a few shades lighter than the photo.
We are going to be buying all new furniture, so we're starting with a clean slate. We're thinking that a lighter colored couch would be good, since the walls are so dark. We also want an area rug, probably also in light colors. The furniture, aside from the couch and a piano, will be Craftsman/Mission style. I realize this is pretty wide open, but I'm a color wimp, and I'd like some suggestions on what colors would coordinate well without being boring or looking too modern. Any suggestions on what color the couch and/or rug should be? Thoughts on accent colors?

11/15/2006

Miscellaneous Ramblings

This post is somthing of a catch-all. I haven't been very diligent about updating in the past 2 or 3 months, so this is an attempt to bring the blog up to speed...

When we bought the Prairie Box, the previous owners left some things behind. Nothing like House in Progress... All of the stuff our POs left was potentially useful. We were a bit mysified by the amount of mouse bait they had out. There were little D-Con poison pellets in each of the upstairs closet, scattered around on the insulation in the attic, and all over the basement. After seeing this, we got a little anxious. What kind of house did we buy? Are there poisoned mice inside the walls? And over a year later, we still had yet to see so much as a little mouse turd. So, to prevent poisoned mice from finding their way into the walls, and to keep Kitty from poisioning herself, the mouse poison in accessible places was thrown away.

And then, two days ago, Shayne went down into the basement and found a dead mouse. Who needs poision when you have a cat? :) I have to say I'm impressed. Kitty has never been much of a hunter, and until we moved out here, she was kept indoor except when under strict supervision. Now, Kitty goes out just about every morning. She turned up a month or so ago with a dead bird, which was a first for her. And now the mouse. Go figure. 12 years old, and she finally learns how to hunt! Now maybe Shayne won't crab as much about her being useless...!

A month or so ago, I found another former heat vent. This one is in the kitchen, under/behind the stove. In the past, the kitchen cabinets only took up 2 walls. When they covered the 3rd wall with cabinets and appliances, they also covered up the heat vent. I found it by accident when I took off the panel on the bottom of the stove to vacuum underneath it. It's covered by a piece of galvanized sheeting and duct tape. 
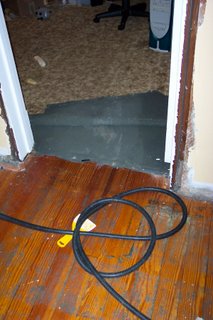
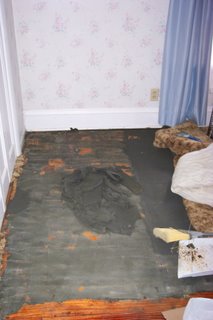
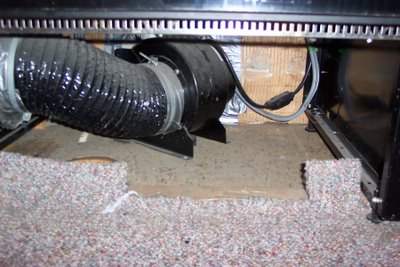
No wonder this house is heated and cooled so unevenly. It's missing about 3 or 4 vents... Also under the stove was a look at some ancient tile or linoleum, which they carpeted right over. Nice. I'd rip up the carpet, but Shayne would probably kill me... The picture also shows a lovely circular hole that is cut through the floor. No clue what might have been there.

11/01/2006

Step One: Remove Head From Sphincter

As much as I don't like to admit it, I think I've been somewhat depressed lately. I can come up with all of the excuses that I want, but the point is that all I've been doing is moping around for the past few months wishing that the house was perfect and didn't need any work. There's been some sporadic activity (I got the basement storage area cleaned and organized, we attacked and reformed a few flower beds in the yard, I reorganized the kitchen, etc), but I've really lost track of where I'm going. This morning, I looked at the living room and thought, "I really like this room. It gets great light all day, year-round, and the floors are beautiful. Why am I not working on finishing it?" And I coulnd't come up with a better answer than laziness and an odd lack of motivation. Maybe I thought if I ignored it long enough, it would finish itself...?


So, I'm finally pulling my head out of my ass. Remember this picture?

That's where I need to be.

Friday morning, Shayne and I are going to go to Lowe's to find a stain for the living room woodwork. The amber shellac looked WAY too orange, and even the garnet isn't the color I want. I'm still going to use shellac, but as a finish coat over the stain. I'm trying to match it to the inside of the closet door in the front bedroom, but if I can get close, I'll be happy.

I need to have the living room done by Christmas. I promised myself I could decorate this year. All I need to do is stain/shellac the trim and put it back up. Not a big project. Not a difficult project. Not even a time consuming one.

I think I need a cheerleader. Or maybe a Marine drill instructor...

10/22/2006

Emergency Preparedness

I had to take a little time off from both the house and the blog. For reasons both personal and professional, I've been extremely stressed lately. I haven't made much progress on anything, and I figured that it would be better to take a break than to get burned out.

Another source of stress has been very personal. About 3 weeks ago, Shayne fractured his C6 vertebrae in a fall. It was just a hairline crack, but he has to wear a neck brace for up to 8 weeks. The doctor said that the brace is basically a preventative measure against further damage, and at the last check-up the doc said Shayne's healing fast, but he's restricted to "light duty" at work until released by the doctor. Because the department he works for is so small, there isn't much as far as light duty. In the meantime, he's taken up dispatching and has begun training and taking classes. Thankfully this keeps his paycheck coming in, and we don't have to worry about depleting our savings. God has been very good to us, and I appreciate the prayers and support from all our family and friends.

All of this has gotten me thinking about what would have happened to us if Shayne hadn't been able to work. Or what would happen if I couldn't work. We have a savings account, but it wouldn't last forever. It wouldn't even cover a major repair on the house if there was a big problem or a disaster of some sort. I'm sure we have enough in the pantry and freezer to get us through a week, but we'd be SOL if the power was out. Our well pump wouldn't function, and we'd have no water besides what's in the tanks and hot water heater.

After talking with Shayne, we've decided to set aside an area under the stairs and dedicate it to an emergency preparedness kit. Some guides recommend having a 1 year supply of food, but we're not going to go that far. I'd feel more than comfortable with about a month's supply of canned goods and pouched, canned, or freeze-dried meat; staples like flour, sugar, and salt; extra water; first aid supplies and extra batteries; and a way to stay warm and dry. Some of these things I already have due to my backpacking habit. I have a stove that runs on denatured alcohol, and sleeping bags and tents that could keep us warm and sheltered in sub-zero conditions. I have a water filter, and we're close enough to the lake that I could conceivably use it as our water source. I even have a little heater that runs on 16 oz propane cylinders. The food and batteries are something I'll have to work on...

A part of me feels a little paranoid for even thinking about this, but my complacent attitude wouldn't help us much if there was a bad blizzard and we were snowed in for any length of time. Or if one of us was out of work and we couldn't afford to buy groceries... In any case, I'd rather err on the side of paranoia, considering the alternative.

Here are a few links that I've found to be helpful:
Emergency Essentials
The American Red Cross
The Prepared Pantry

I'll keep you all updated as this project progresses...

9/06/2006

Still plugging away

I've made some progress on the living room woodwork (finally), and it should be all stripped and sanded by next week. We might even get the shellac on and get everything nailed back up. We'll see... Once everything is back in place, I'll put the final coat or two of shellac on the floor and wax it. Then I'll sit back and enjoy having a finished room for about 2.6 seconds before I start tearing up something else. *sigh* I really just can't leave well enough alone.

As an interim project while we're saving up for the bathroom or kitchen remodel (still haven't decided which will be first), I'm going to repaint the psychotically bright yellow and green front bedroom something a little more, umm, subdued. Like sage green with cream woodwork. Or maybe I'll get brave and strip it, too, even though it wasn't in our plan. Either way, that room is easy, since the walls and ceiling have already been repaired and are free of wallpaper and tiles.

If we're still broke after that, we can move on to the office. The work in there is less superficial, but still inexpensive. Same with the master bedroom. It seems there will always be plenty to do...

8/29/2006

Then again, maybe not

Just when I thought I had the next year in home improvement all laid out, we started talking again about remodeling the bathroom next instead of the dining room. Why would we do this? For starters, we HATE the bathroom. It's functional, it's clean, it's not falling apart, and it's even fairly aesthetically pleasing. It even has plenty of storage. However, it is easily our least favorite room in the house, beating out the torn up office for that honor. We don't really have a good reason for disliking the bathroom, other than that everything but the floor tile and sink cabinet is half-assed and/or cheap. We even had a nicer bathtub in our rental hovel...

So, for the sake of being able to take a bath again, and have an oasis in the chaos, we're seriously thinking about doing the bathroom.

Due to it being the only full bathroom in the house, the plumbing to the bathtub can't be disconnected for very long. We can shower at work if we have to, but it would be better if it didn't come to that. At least not for any length of time. Of course, we also don't know jack about plumbing. I can install a water filter, and Shayne can unclog a drain, but that's about the limit to our experience. We're going to have to hire this one out.

It's looking like every fixture in the room will be moved. I can't say that I'm thrilled with that, but the current layout sucks and doesn't leave us with much useable floor space. By moving the fixtures, it will open up the room and make it feel larger than it does now. It might also cause problems, since the long wall is an outside wall... Below are the current and expected floor plans. The boxes next to the tub and sink are ceiling-height cabinets.

We've got the basics figured out for the materials: beadboard wainscot, subway tile shower surround, 1" hex tile floor, pedestal sink, and a cast iron drop-in tub. I really wanted a clawfoot tub, but Shayne's dimensions apparently aren't standard enough for a standard tub. 14" of water in a 5' tub means that almost all of him will be out of the water, making a bath rather pointless. Kohler's Tea-for-Two tub is the deepest (19.5" of water at the overflow!) cast iron tub I can find that is under 6' long, so I'm hoping to find one of them on sale...!

8/23/2006

Happy Anniversary!

As of tomorrow, we'll have lived in the house for 1 year. We've owned it for a year and 1 month now, but we couldn't move in until August 24, 2005. Happy house anniversary to us!

Here is what we've accomplished in our first year:
  1. Removed the ugly shower door and replaced it with a rod and curtain
  2. Painted the basement
  3. Removed the carpet, wallpaper, and ceiling tiles from the living room and upstairs hall
  4. Repaired and skimcoated the plaster in the living room and upstairs hall
  5. Painted!
  6. Refinished the living room floor (twice)
  7. Installed an "invisible fence" to teach the dog where the yard boundaries are
  8. Tore out 4 yew bushes in the front of the house and replaced them with a raised flower bed
  9. Tore off and rebuilt the roof of the connector between the two garages
  10. Stripped and sanded lots of woodwork
  11. Tore out the carpet in the upstairs office and closet

It hasn't been a super-productive year, but we are learning as we go. With both of us working full-time jobs and having limited funds, I think we're doing okay.

Here is what we hope to accomplish in the year to come:

  1. Completely finish living room and purchase furnishings
  2. Remove paneling, wallpaper, laminate floor, and ceiling tiles from the dining room
  3. Repair dining room plaster and skimcoat
  4. Paint the dining room and install board and batten wainscoting
  5. Refinish dining room floor
  6. Install built-in cupboard
  7. Remove carpet, wallpaper, and ceiling tiles from the kitchen
  8. Strip, repair, and repaint the original kitchen cabinets
  9. Build new cabinets to match originals
  10. Reconstruct smaller original doorway between the dining room and kitchen
  11. Run new duct to the office in its original location

Sounds a little ambitious, doesn't it...?

We have a yard! And a garage!

Even thought I haven't been posting, we've been busy doing maintenance-type stuff here at the Prairie Box. Most importantly, we finally cleaned the garage. It's been a MESS since Shayne rebuilt the roof connecting the two garages, and we finally decided to do anything about it. That took about 4 hours on Saturday. Then, Shayne put together the wonderful grill that my mom bought us as an early Christmas present (since Shayne and I both have birthdays in December, Christmas in July is becoming something of a tradition...). I'm also in the process of weeding all of the flowerbeds one last time before we put down mulch. The front bed is done, and the large back bed is nearly so. The side flowerbed that borders our neighbors fence needs lots of help. It's been taken over by evil life-sucking vines and blackberry bushes. The utility easement on the north side of our property is also in need of help, but I think that might have to wait till spring or fall, since it's way too overgrown right now to even attempt. Since it's woods, though, it doesn't look bad, but I know it should be more open and less weedy. In spite of all the work that still needs to be done, the yard looks better now than it has all year. I'm going to plan better for next summer and make sure that my projects are wrapped up enough to work on the yard more and the interior less.

I've also been plugging away at the stairway. The railing is a bitch to strip, and I'm not sure if there's a way to make it go faster. I've been using steel wool and denatured alcohol to trip off the shellac and remaining paint flakes. As with everything worth doing, it is tedious and labor intensive. But it looks so much nicer without the paint!

We are having a cookout/open house on September 16, so we are going to be busting our butts until then to get the living room totally finished. We might not have our furniture by then, but I plan on having the woodwork, walls, and floors completely done. That gives us 3 and a half weeks to buckle down and "git 'er done!"

8/10/2006

The Stairway of the Damned, Part II

A few months ago, I posted an entry about the difficulties of stripping the stairway. It's not the stairs themselves but the railing, balusters, and newel post that are the problem. Space is tight, crevices are plentiful, and some of the finish had worn away before they painted, making the paint a pain to remove. If I could dismantle the whole thing, it would be much easier, but since it's so solid, I don't want to even try. I'm afraid that it would wobble after we put it back together. That, and I'm not even sure how it would come apart. There are no nails that I can see.

Maybe it's time to suck it up and buy some Peel Away...

8/02/2006

Idea File: Exterior Color Scheme

I was putzing around on the internet a few days ago and came across a website for a restoration company in Atlanta called Laughing Sun Renovations. Although I don't like everything they do, this picture of a Foursquare really caught my eye. 
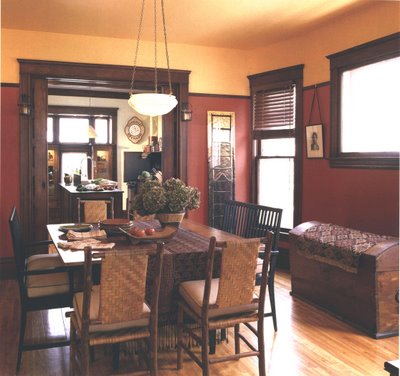
I'm aware that it will be years before we're ready to tackle the exterior, but it's never too early to start thinking! I mocked it up on BHG's Home Designer, and this is an approximation of what it would look like on the Prairie Box.
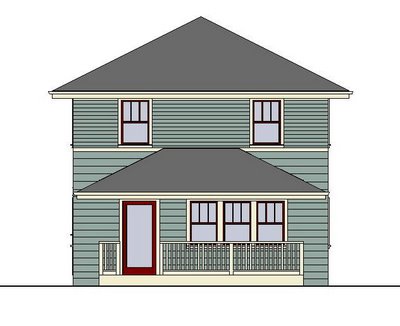
Hopefully, our porch will have columns and stairs(!), but I really like the green. All of the houses in the area are either white, cream, or gray, so it would really stand out.
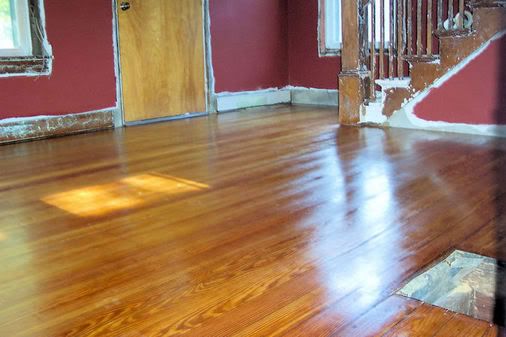
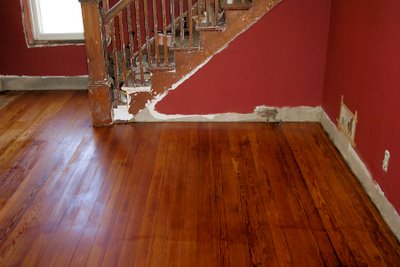
The Craftsman Living Room?

Now that the living room is kinda-sorta-almost done, we've been thinking a lot about furnishings. Particularly, how much period style do we want the room to have. Obviously, we still want the room to express our tastes and style, but we'd also like to remain true to the Craftsman ideal. This quote by William Morris perfectly condenses the ideal that we are striving towards: "Have nothing in your home which you do not know to be useful or believe to be beautiful."

Sounds simple, right? In the end, it will be. For right now... We already have a surplus of non-useful, non-beautiful items, but as we decide how the living room will take shape, I'm confident that the beautiful and useful items will rise to the top, and the rest we can donate to Goodwill.

The issue that I'm most struggling with right now is the couch. Specifically, since we don't have one, what kind of couch would look good in the living room. We really, REALLY like leather, but I'm afraid that a dark color will not look right against the dark walls (and neither of us is fond of light-colored leather). I'm actually considering getting a new frame for our futon, since it has a nice mattress with springs, and it could double as a guest bed until we get the upstairs done. I found a futon frame online at Creative Futons that looks like Craftsman-style sofa, but is actually a futon. And, best of all, you don't have to move it away from the wall to turn it into a bed.

Once we get a little closer to completion, we can take a look in town to see if there's anything comparable.

8/01/2006

A Good Shellacking

Shellacked living room floor eye candy!

Photobucket - Video and Image Hosting
I'm still going to put one more coat of shellac on, but it looks awesome. The floor is glossy with a depth of color that is amazing. I've been doing the happy dance for the past 2 hours, since I'm so relieved that I didn't screw it up this time...

7/31/2006

Collateral Damage of Renovation/Restoration: Scaring the Neighbors

I'm starting to feel bad for our neighbors. Before we moved in, there was a very nice, tidy couple with a baby that lived in the Prairie Box. They planted some flowers in containers on the porch, kept the grass mowed, did some minor work on the house, and lived a nice, typical suburban life. I'm sure that they were universally beloved.

And then we came along.

Now the grass is long and weedy, and the planter boxes on the porch are neglected and empty. Every few weeks, a large pile of rubble appears at the curb, containing everything from carpet to 2 by 4s to curtains. We stay up til 4 am sanding and hammering. They have to wonder what the hell we're doing over here, especially since it was such a "nice house" to begin with. It's not like the Prairie Box was one of those neglected, forlorn homes that the neighbors are thrilled when you start fixing it up. Our house wasn't the eyesore of the neighborhood. To most eyes, our house was fixed. I'm seriously waiting for someone to come over and ask exactly what we're doing to this poor house.

Speaking of what we're doing to the house... I was supposed to go camping on my days off this week, but due to the extreme heat (and never-ending to-do list) I decided it would be best to stay home. I haven't accomplished too much yet, but I did get a second coat of shellac on the living room floor. Finally. With the addition of the second coat, it's starting to get a nice, uniform shine. It was a little shiny with one coat, but only on the dark part of the grain pattern. Don't know why. I'll put a third coat on tomorrow and see how much glossier it gets. I don't want it to be mirror-shiny, but it needs to be more uniform than it is now.

Here's what I'm hoping to accomplish on my next 2 days off:
  • Finish the floors - completely
  • Sand woodwork (weather permitting)
  • Declutter the dining room and office

I also need to find a way to get the paint off of the living room windows. The genius second owner painted them without sealing them, so the paint is damn-near impossible to get off. The only thing I've found that works is paint thinner and lots of elbow grease. Each window will take at least an hour, but I won't be able to work on them until the weather cools off a bit.

7/23/2006

No more leaky garage roof!

When the second owner of our home took on a project, he never, ever did it right. I haven't found a single addition, repair, or remodel that wasn't screwed up in some way. The third owners told Shayne and I that they had fixed some of Owner #2's weirder additions to the home, but I have my doubts. From what I can tell, they painted the paneling in the dining room, put down Pergo over the hardwood, covered the floors in two of the upstairs bedrooms with polyurethane without stripping first, and skimcoated the walls in the master bedroom and little front bedroom (Hey! One out of four ain't bad!). In 5 years, I don't consider that a whole lot, especially considering the really obvious weirdness and damage they left unfixed. In their defense, I'm pretty sure that they updated the electrical and HVAC, so I don't suppose I can complain too much.

One of the biggest unfixed items was the addition connecting the "new" 1950s garage to the original garage. The connector had a flat, shingled roof, and looked to have leaked for about 10 years. At some point, that special second owner had realized that a flat shingled roof was an invitation for leaking, especially since he hadn't bothered with any flashing, and had tarred over the whole thing. It began to leak again, probably in the mid 1990s. The third owners must not have been too bothered about a leaking roof, and simply let the water damage and rot continue unimpeded. We spent the winter with a tarp jury-rigged between the three roof pitches, and probably prevented the roof from collapsing under a heavy snow or ice load. Now that summer had come, it was time to fix the roof once and for all.

Shayne started off Friday afternoon by demolishing the old roof. The whole process, including cleanup, took mayber 3 hours. The wood was so rotten, it basically just fell down in defeat when he threatened it with the crowbar.

Saturday morning, our friend Randy came by and helped Shayne sister the framing around the doorways and in the connector walls, frame a new roof, and shingle it. Our new connector roof has about a 6" drop over 2.5 feet, which is shallow, but water flows down without pooling. The reason they had to keep the pitch so low is because they had to work under the 24" overhang from the original garage but still make it high enough to walk through on the inside. Three people can stand on it, so it's plenty sturdy.

I don't have any pictures, since I was busy shellacking the floor while they were working, but I'll post some soon.

7/22/2006

A floor to be proud(er) of

The floor has gone through quite a transformation this week. We went from this:
To this: Back to this:
And finally, to this: 
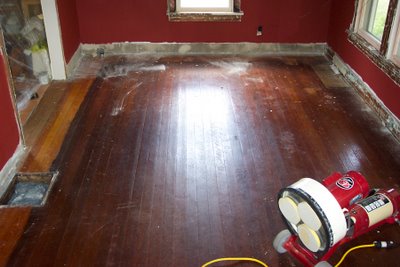
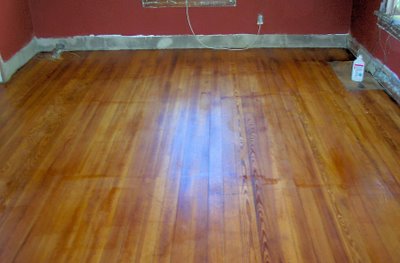
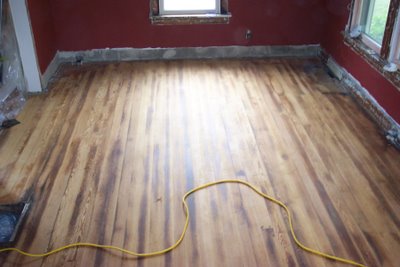
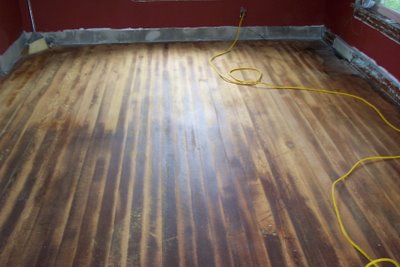
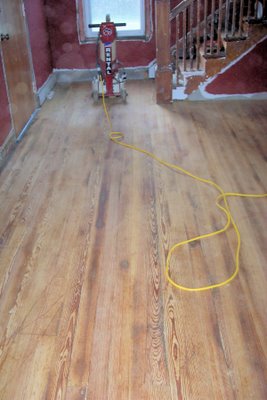
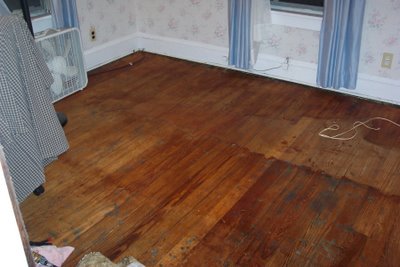
We're not done yet, but the first coat of shellac went on beautifully this time. No problems. Of course, it also helps that I did it right... This time around, I used clear shellac. For every 2 cups of 3lb cut I used, I added 1/2 cup of denatured alcohol to thin it. I also made sure to spread it as smoothly as possible from one end of the board to the other (lengthwise). I only did 3 boards at a time this time, and I instead of using the lambswool applicator on the pole, I got down on my hands and knees so I could monitor the coverage more closely. I think that the results speak for themselves, but the floor looks so much better than it did before that I can hardly believe it. The far left side in the picture is still wet, which is why it looks a little darker than the rest of the floor, but everything is a uniform golden color with no splotches or thick spots. The only flaw is a deep scratch that runs the width of the floor, right in the middle of the room. It didn't show up well in the above picture, but it's pretty noticeable in person. I sanded the hell out of it, but it was so deep that it didn't help much. Once we have a rug, though, it should be less visible.

Later today I plan to put on another coat of shellac, this time one-third amber and two-thirds clear. I'd like the floor to be just a little darker and less yellow, but I don't want to lose all the bright happiness of the clear coat. After the second coat, I'll add a third coat of thinned clear before I wax. That should be another adventure, since I've never waxed a floor before in my life. Whee...

I really can't express enough how thrilled I am that the floor turned out this well. After having to re-sand the floors, I was terrified that I'd just ruin them again. I agonized over whether I should just give up the whole shellacking thing and just polyurethane them like everyone suggested. Shayne was supportive of whatever I decided, so long as I would be happy with the results. Everyone else said that the shellac was a bad idea and poly was the way to go, except for my best friend Diana. In the end, I followed my gut and my ideals instead of following the crowd, and I'm so glad I did. The poly-ed floors upstairs just don't have the warmth and natural look that the shellacked floor does.

7/20/2006

Sanding the Floors, Part II

Due to my really crappy shellacking, I decided to start from scratch. Again. This time, I did it right. We rented a drum sander and truly leveled out the floor. The drum sander is a totally different beast than the Medusa-like orbital sander, but once I got going I was fine. It was the getting going that was the problem.

Shayne picked up the sander from the rental place and deposited it in the living room. After showing me how to load the paper, he left for work. Alone with the scary machine, I warily turned it on. Loud, but no problems. I started to slowly push it forward while rocking it down to contact the floor. Disaster. The second the drum hit the floor, the sandpaper exploded and flew everywhere. I quickly turned off the machine and went to assess the damage. The floor was a little shredded, but since I was moving, it was a line and not a gouge. I got a new sheet of paper, reloaded, and tried again. This time, I moved about 12" before the paper exploded off the drum. Since I was already afraid of the drum sander (due to the horror stories I'd heard about it runnning away and ruining floors), the fact that it kept exploding at me only made matters worse. My floors were ruined, the sander wouldn't work, and I'd have to get wall-to-wall carpet to hide my damage. In light of those revelations, I did what any self-respecting, modern woman would do: I burst into tears of frustration and went to hide upstairs.

I came back down about 30 minutes later, after reading about the SL-8 sander on the internet. Supposedly, if the cams that hold the paper are not tight enough, the paper will break. I gingerly loaded another sheet of 36 grit paper, tightened the cams fully, put in earplugs, and turned the sander on. The Exploding Paper Monster was vanquished, and a purring tiger was left in its place.

I had heard horror stories about gouged floors and uncontrollable sanders, and I feel obligated to say that, if you use it properly, it's very easy to use and control. Aside from my paper explosions, which were completely preventable, the sander is a tame beast. It doesn't pull like I expected (I could contol it with one hand, even though I used 2), and the only gouge I got was when I sneezed with the sander moving along the floor. It hardly uses any sandpaper at all compared to the EZ-V. I used 6 sheets for the whole room, including the 2 that I ruined. Total rental cost was under $50. Guess what sander I'll be using next time?

After sanding, I wiped down the floor with mineral spirits and prepared to re-shellac. This time, I used a thinned down coat of clear, and I only applied it to 9 boards in case it was horrible. I applied it to 3 boards at a time, moving with the grain, and coating the whole board at one time. Here are the results:
9 shellacked boards
The 9 shellacked boards are little darker than the natural wood, but not too much. The color variation is due to the floor, not the shellac (thank God!). I'll still be adding a coat or two of amber over it, but it's a nice start...

7/15/2006

Beetle juice

I woke up at 8:30 this morning to return the floor sander to K Wood Products, which is the hardware nearest our house. We kept it under $175 in rental fees and sandpaper, but just barely. The gentleman that works there (possibly the owner) is going to start looing for picture rail molding for me, which is awesome. They have a sample on their board of woodwork that they stock, but he said that because it's not that popular, they didn't reorder when they ran out. Hopefully I'll be hearing from them soon.

We didn't get to bed last night until after 2 am. We wanted to get the first coat of shellac on the floor so that it could dry overnight. It didn't turn out perfectly, but I'm satisfied with it so far. We'll need to put on at least one coat of amber shellac, then use clear as "build coats". Even with just one coat, the floor has a nice sheen and color. It's still a little too yellow for my taste, but the second coat thould take care of that. The only bad part is that there are lap marks and slight unevenness where I had to refill the applicator. There are more towards the south end of the room, where I started, than at the north end. I think at the beginning, I was putting it on too thin, and it dried while I was refilling the applicator. Towards the north end, I started to be a little more generous with the shellac, and there are fewer lap marks, and the color is richer. I've tackled a few spots with denatured alcohol and steel wool, and the color has smoothed out, so now it's just a matter of doing that everywhere there's a mark. I'd better go get some kneepads...

South end

North end

Surprisingly, we didn't have too much sawdust floating around. The sander did an excellent job of picking up its dust, so almost all of the mess was from the little orbital sander. I think that next time, I might get brave and rent a drum sander, but overall I'm satisifed with how everything has turned out.

In case you're curious about the title, "beetle juice" is Shayne's name for shellac. It doesn't sound quite so glamourous that way, but it is accurate, since shellac is made from the secretions of the female lac beetle. The resin is then harvested off of trees, supposedly without harming the beetle.

7/14/2006

Fun With Floor Sanding

After working most of the day, I am just about finished sanding the floor. Shayne is downstairs working on sanding around the edges, and I'm taking a much-needed break.

Today went much better than yesterday. The floor was dry and free of nealy all shellac. The boards were more cupped than I anticipated, so I ended up having to go back to the hardware store for more super-rough paper. Even now, there are some spots on a few boards that refuse to level out. We're going over those with the hand sander to get the last bits of old finish off, but they're just going to have to stay unlevel.

It's pretty ironic that I was worried about the floor sander being too aggressive. The exV is almost not aggressive enough. The living room floor is probably one of the worst, since it sees so much use, but I might use a drum sander on our other downstairs floors. Having not done this before, I'm not sure how long it usually takes to sand a floor, but we seem to be progressing rather slowly.

Here are a few "before" and "during" pictures for your viewing enjoyment:
I tried out the amber shellac on a board in the office last night, and it looks good. I think we'll be doing a few coats in clear to keep it from getting too dark, but it should look really nice.

7/13/2006

Discouraged

I can't believe I was excited about having floors with the original finish intact, since it means more layers of crud to get through before I can sand the wood. I also can't believe what a bitch this shellac is to remove. I've stripped it with Citristrip, washed the floor twice, and mopped with denatured alcohol, and and I think it's finally off. However, the sandpaper is still gumming up, since the floor is now too damp. It's dry to the touch, but the sander must know the difference.

Lesson: Do better prep work beforehand. Don't expect the sander to do more than sand the wood. Get the shellac off before trying to sand, and give plenty of drying time...

Nothing Is Ever Easy

I should know by now that nothing ever goes as planned. I should be downstairs sanding the floor, but here I am upstairs piddling around on the computer. Now why would that be...? Well... I guess the shellac on the floor was in better shape than I thought. There's so much left on the floor that it was gumming up the sandpaper in about 45 seconds. Since it was a pain in the ass to keep stopping to pick the clumps off the paper, I 'm stripping the floor first. I tried scrubbing the floor with denatured alcohol, but it was extremely labor-intensive (i.e. it hurt my bad shoulder) and I ended up with a 1.5" splinter in my palm. That was the end of that. I slathered on some trusty Citristrip about 20 minutes ago, and I'll go scrape it off in about another 20-30.

I should have known this would happen. I'd read about it happening to other people. I just didn't think that our shellac was that thick. So... Here I am, biding my time and kicking myself for not prepping properly. Live and learn, I suppose.

7/10/2006

Shellac and Floor Sanding Madness

It's official: The floor refinishing madness will begin on Thursday. On last Thursday, Shayne and I stopped by a local hardware store to inquire about their floor sander rentals. I've decided that I do not want a drum sander, since our floors are in good shape and don't need any radical leveling. They also don't seem to have many layers of finish. Surprisingly (to me), they rent Varathane's ezV sander, which is the Medusa of orbital sanders. The ezV resembles an oversized carpet cleaner, and it has 3 smallish random-orbit heads positioned in a triangle. It is supposedly tough enough to strip the finish off a floor, but gentle enough not to leave gouges. I guess we'll find out on Thursday...!

I'm feeling pretty good about the sanding, but I'm very nervous about the finishing. Against many people's better judgement, we've decided to finish the floors with shellac and not polyurethane. Every time I tell people this, even old house people, they tell me how wonderful oil-based poly is and how weak a finish shellac is. Maybe I'm missing something here, but the original, 80+ year old shellac on the floor downstairs looks fine. It's not worn down to bare wood or scratched to hell, and it looks way better than the edges that were refinished probably inthe '60s or '70s with varnish. In some ways, it even looks better than the polyurethane upstairs, since it really brings out the texture of the wood. It looks like wood, not wood coated with something, if that makes any sense.

So, Thursday will be sanding, and Friday and Saturday will be devoted to shellacking. I'm going to go panic now...

7/05/2006

I'm impressed with myself... Today is my first day off, and I've actually accomplished what I planned to, along with a couple of other things. So far, I weeded the back flowerbed for the second time (note to self: Use Preen this time!!), assembled the new Black and Decker mini workbench, sanded some of the living room woodwork, made cookies, did the dishes, and cleaned up some of the clutter in the garage and the house. Up next is vacuuming the house and possibly some painting. If I don't paint, it will be because I'm trying to declutter the few livable spaces we still have.

We really need to start organizing our stuff. We are accumulating piles at an alarming rate. Part of the problem is that I don't want to buy any furniture that we won't keep for a long time. And I also don't want to buy any furniture until the room that it will go into is finished. It's hard enough to keep moving things around with the little furniture we have. I also change my mind so many times in the course of a project that buying furniture before the project even starts could be very counter-productive. I know that the downstairs will be Arts and Crafts style to match the period and character of the house. Upstairs I'd like to be a little more expressive. I don't want it to clash, but I definitely want the private areas of the house to be a little more personal.

Tomorrow, Shayne is off work, so we'll be working on the landscaping again. He's going to go pick up a yard of dirt so that we can finally finish the flowerbed in the front. It looks much better without the bushes, and I'm sure it will look great once we get some flowers in there.

7/04/2006

The Kitchen Floor Plan Version 1.5

I dont' think that I like the first layout as much as I wish I did. There isn't enough under-counter storage space for pots and pans, and I'd like more counter space. I think we'll be able to use the original cabinets, but maybe not in their original configuration. We're going to have to either salvage or build others to match. We might even have to start from scratch, but I'm not going to worry about that quite yet. Let's get the floor plan settled first...

Here's the new-and-improved version...

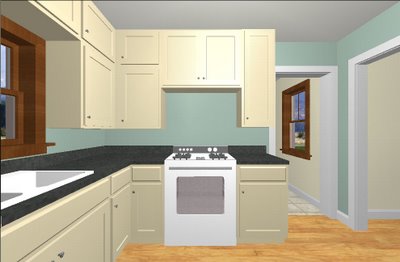
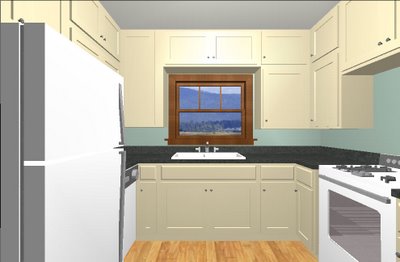
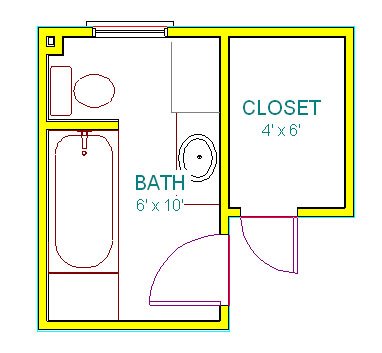
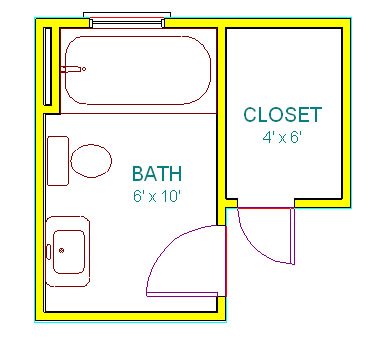
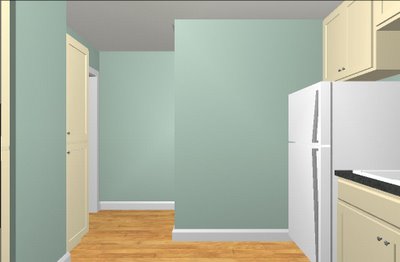
I don't have time for a commentary right now(I actually just posted these now so that some friends and family could take a look), but I'll be psoting some thoughts about various layouts later on tonight...

7/03/2006

Kitchen Layout Idea Version 1.0

After looking at the original cabinets out in the garage, I came up with a tentative kitchen layout. I mocked it up using the Better Homes and Gardens Home Designer, and I think that I like it. Since the storage configuration is so different, though, I'll need to do some more thinking to see if all of our stuff will fit in the cabinets.

7/01/2006

Planning the Chaos

Today is the halfway point in my workweek. I'm actually working 7 days this rotation, since I switched with someone to get a day off later this month. So even though I should be off on the 4th, I'll be working (and I'll get holiday pay!). On the downside, that means I'll only have 2 days off this week to spend on the house... Barring any unforseen catastrophes, I think I'll finish painting the living room and hallway. We have color everywhere, but some parts of the ceiling and most of the cut-in work needs a second (or third) coat. I'll also get off my reticent behind and work on sanding the woodwork. Shayne got 3 pieces finished the other night, but that was the end of the progress for a while. I know I've needed to sand them for a long time, and I can't figure out why I'm so unmotivated about it. It's like I'll do anything but work on the trim... But I can't delay any longer, since on my next three days off I'm going to (drumroll please!) sand the floor!

I haven't gotten much support in my decision to use shellac as a floor finish, but I don't want plastic on my floor. People argue that it doesn't hold up well, but the original shellac finish in the living room looks better than the 30 year old varnish around the edges, and it's easy to souch-up any mistakes or damage. I also don't mind waxing it once or twice a year to protect it. It dries in about 30 minutes (we don't have to vacate the house for a week), it doens't stink, and it's all natural, and it's a no-brainer for me. Plus, it's what was there originally.

Shayne and I have been talking about getting a temporary bathtub. We're not going to be redoing the bathroom for another 3 years or so, and the tub we have it ridiculously shallow. Our ideal bath is a Kohler Tea-For-Two 5.5' tile-in tub:

This tub is DEEP! It's 19.5" to the overflow and holds 105 gallons of water (standard tub holds 60). It's also designed for 2 person bathing, just in case. :) It will be installed like this tub from a 1920s Crane ad: 
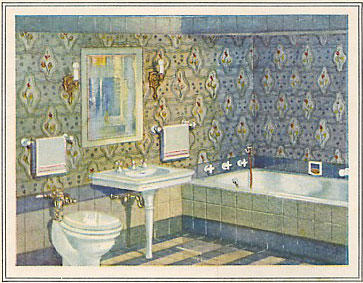
Unlike the ad picture, we will have a shower. I still wish we could have a clawfoot tub, but it just isn't practical for Shayne. Before we make our final purchase, though, I plan on visiting a couple of salvage yards in Chicago, just in case we can find a freestanding tub big enough to fit him comfortably. Can you blame him for wanting a bathtub where half of him isn't out of the water?

6/29/2006

New and improved outside pictures

We finished tearing out the shrubs and got a load of dirt and lots of mulch to fill it all in. My mom generously donated some flowers from her garden, and we now have a new flowerbed in the front.


6/25/2006

Working Outside the Box

Today we concentrated on working outside in the yard. Shayne ripped out 2 shrubs in front, and my mom and I worked on pruning the bushes, weeding and rearranging the WAY overgrown flowerbeds, and planting a few new flowers. I don't really have any before pictures, but these in-progress pictures show a HUGE improvement.

When we started, the flowerbed by the air conditioner was completely taken over by mint. It was everywhere. Think seaweed, but on land. As we started ripping it out, we found that there were 3 different varieties, plus some chives and a lily hidden inside it. We also found this little guy, which made us happy, since we are planning on putting in a small pond in a year or so. I know he's a toad and not a frog, so we probably wouldn't see them much except at mating time, but it's still nice to know that we have amphibious critters around.

On the side of the house, we ripped out lots of coreopsis, which had really taken over. We saved only 1 patch, but I'm sure we'll get plenty back next spring. We also found some gloriosa daises and a Shasta daisy, which we separated from the coreopsis. An echinacea and an ornamental grass were also liberated. Hiding under all of the crazy plants were 8 12" patio blocks. I moved those near the water faucet, and we put the hose on them instead of in the dirt. Then we ripped out more grass and pruned the shrubs bordering our neighbor's fence. All in all, we worked for about 6 hours, so that should give you an idea of how bad things were before.

Tomorrow we'll be tackling the remaining 2 shrubs, as well as putting in a very low retaining wall. The grass is pretty aggressive, and I don't want to have to pull it out of the flowerbeds again next year. I may also weed the former vegetable garden. I'd really like to do something with the flower bed bordering our neighbor's fence, but there is too much grass and raspberry thicket to mess with it now. Maybe in the fall or next spring, when I can actually see in there to work.

As for now, I'm going to take a well-deserved (and much-needed) bath.

6/18/2006

Mission Accomplished

And not in the George W. Bush way, either... For the first time in what feels like forever, I not only accomplished a project, I did it in the amount of time I expected it would take! My motivation to work on the house has skyrocketed, which is good, since I have so much else to do.
Here are the pictures of today's progress on the office:

The miraculous adhesive-free spot, surrounded by carpet, adhesive, and Citristrip

The finished product

The reason the floor looks so blotchy is because it is various stages of drying. The light area in the middle/upper right is bare, dry wood. Oddly enough, there was no adhesive there, and the padding just came right off. There was also no finish on the wood; it looked like it had just worn away. You can see the original finish in the top photo. It's not in very good shape, but it gave us indication of what color the floor was originally (amber).

Something anyone who uses Cistrstrip should know: it will raise the grain of the wood. After repeatedly scraping a treated area, I would occasionally catch splinters of wood. Ano even now, when I run my fingers across the boards, I can clearly feel the grain. It might go down again once it is completely dry, but I wouldn't recommend using Citristrip on anything you don't plan on sanding.

It's amazing how much more tolerable the wallpaper is with a bare wood floor. The room is still pretty fugly, but it's definitely showing signs of improvement. I can't do anything else to this room for a while, though, since the next step would be removing the wallpaper and ceiling tiles. The dining room comes next, so I'm in no position to deal with crumbling plaster and faux walls.

Next step: Order some garnet shellac and get busy on the living room trim.

Proud Member of the Can't-Leave-Well-Enough-Alone Club

This is what happens when I'm only supposed to work on one room at a time... Not only do have have an unfinished living room to work on, but I decided to ignore it today in favor of ripping up the carpet in the office. Now, ripping up carpet in and of itself is usually a quick and easy job. Not so in the Prairie Box. This carpet has fuzzy gray padding that was glued directly onto the wood floors. 
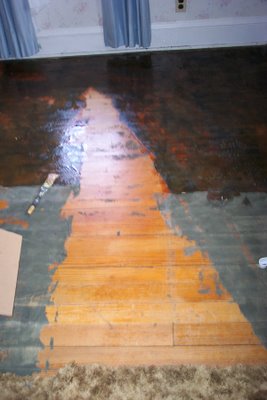
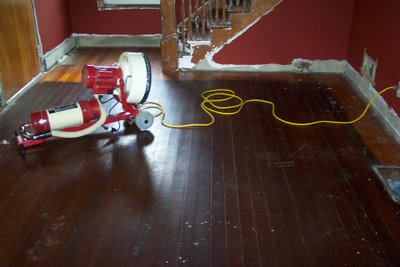
At first, I thought I could use the steamer to loosen the adhesive. It worked, but by the time it did, the wood was saturated. Not good. So then I tried the miracle cure of Citristrip, which disolved the adhesive in less than an hour.
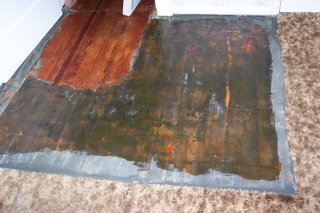
This padding is really something else... It's half dust, half foam, and very nasty. No wonder the carpet in here always looked dirty! Here's a pile from a 6' by 4' area:
Thankfully it's thin, so the scraping part goes pretty quickly. I should be finished with the entire room today, so I'll post more pictures and a progress report tonight.