2/25/2012

Bathroom remodel, day ?? - We have a tub! And no toilet...

Yeesh, the days have just gotten away from me.  I've been going into work early so that I can get home at a decent time and try to get some sleep, but that has left very little time for updating here.  There also hasn't been a lot to photograph, as most of the work was taking place behind the scenes.  But here's a quick run-down of what happened this past week.
  1. tiled tub surround
  2. grouted tub surround
  3. completely removed and replaced part of the floor near the toilet
  4.  re-routed the drain and supply lines for the sink, moving it over about 3 feet to avoid a bottle-neck (we will put the sink across from the toilet instead of across from the tub)
  5. ran new 3/4" PEX lines from the basement up to the bathroom
  6. installed cementboard underlayment on the entire floor
  7. installed hex floor tiles!
It's really starting to look like a new bathroom in there!  Last week it was a cave of darkness, but by this morning (the first time we were able to walk on the new tile) it was looking lighter and brighter.  With white beadboard partway up the walls, it will be much more cheerful than it ever was before.  It also helps that so much more of the floor is visible.  Our layout makes it more open anyways, but there's also more visual space because of the cabinets being on legs and pedestal sink.

Before grout
After grout
Chaos, scary walls, and scary floor...
Laying the tile
Tiling near the toilet
Our new floor!  It looks rather blotchy right now because in some areas you can see
the mortar more than others.  Once the grout is in, it will look more uniform

Next week T will grout the floor, install the new drywall, install the sink and toilet, install the medicine cabinetand re-wire the chaotic electrical work.  We ended up tearing out all of the old drywall after finding it was crumbly and not properly installed, so I guess my idea to save as much original plaster as possible is actually going to happen.  It was all part of my evil plan...  Bwa-ha-ha!  :)

2/20/2012

Thoughts on becoming a homesteader

I'm sure there are folks out there who are anxiously awaiting more bathroom pictures, but right now I'm taking a bit of a detour to talk about other areas of my life.  More pics and an update are coming, though!  I should have more to say about it by tonight.

I just had one of those moments when I looked at myself, as if from the outside, and wondered who I was and how I got to where I am.  I was in the kitchen, mixing up flour, yeast, water and salt for bread.  A big pot of vegetable beef soup was cooking on the stove.  The beef is from a cow named Dolly, I grew the onions myself, I grew and canned the tomatoes that went into the tomato juice, and most of the other ingredients are from local farmers.  My sink is full of canning jars from food we've eaten and ingredients we've used in the past 24 hours.  Next to the stove was a wooden crate of herbs and several little jars of homemade "Neosporin".  I could hear my rooster, Pretty Boy, crowing out in the backyard.  And I was thinking of the apples on the back porch that are starting to get wrinkled, wondering if I had time to make applesauce tonight.

It really struck me how far from "normal" I've strayed. 

Sometimes I look at the blogs I read and people on message boards and feel like they are "real" homesteaders and I'm just dabbling.  I don't grow even close to all of my produce, I still buy bread at the store more than I bake it, and I eat out WAY more than I should.  But taken as a whole, the way we choose to live is not even close to mainstream. 

How did I get here?  How did my rather normal and unremarkable childhood (no offense, Mom, I just mean that I wasn't brought up on a farm or by hippies!) turn into this not-at-all normal lifestyle?  I keep wondering if there was a turning point, I place where I suddenly realized that I had to have chickens in my backyard, or grow and can my own tomato sauce, or know the cow that turned into my hamburger.  But I can't find that place...  I don't know when my mentality shifted and I became aware of how unsustainable and unhealthy so many modern practices are; I don't know what made me decide to opt-out.

But here I am.  Here I am with chickens in my backyard, a cow named Dolly in my freezer, and bread rising on the counter.  And I wouldn't have it any other way.

2/16/2012

Bathroom remodel, days 6 and 7 - the tub alcove takes shape

 Day 6 brought no spectacular visual changes.  T framed in the soffit, put up the sheetrock, and secured the cementboard in the tub surround.  He also cut and framed in the shampoo shelf within the surround.  It was good for me to see how the tub looked in its alcove, and I was happy to see that it didn't result in the bathroom feeling closed-in like it used to.  I had been just a little worried, but the room still feels very spacious and as bright as a room on the northeast of a home can in the winter.  It will be better yet with a white tile floor and white wainscot on the walls.  Here are a few shots of the day's progress:


This shot makes the ceiling seem awfully low, but we had the shower arm
raised to accommodate Shayne's height.  The alcove is 7 feet tall.

Shampoo alcove built into the surround
Day 7 was the start of tiling.  T was only able to put in a half day due to a prior engagement, but he got the tile up on the back wall of the alcove.  I only have in-progress shots at the moment, as I had to leave for work before he was finished, and I have yet to take more.  But here's what I have:

The first two courses...

Almost finished!
I'm so excited that this looks as good as I'd hoped!!

2/14/2012

Bathroom remodel, day 5 - We have a tub!

This is going to be quick, as I'm exhausted and need to do a few things and get to bed.  But the big news of today is that the tub is in, has all of the plumbing installed to it, and the surround framed and walled with cement board.  I was worried that the bathroom would look closed-in, like it did before, but even with the new wall, everything seems spacious.  In fact, I'm amazed at how big the room looks in spite of a larger tub.  It seems like the PPOs did everything they could to make the room look teeny - and succeeded.

Here's a peek:


We did decide to install the tub flush with the north (left) wall.  Originally, the plan was to have some open shelving over there, but after consulting with T, it seemed that the space was too tight to be very functional.  We opted to scoot the tub over and instead open up the area where the toilet is.  Before it was very cramped and awkward-feeling, especially because there's a bump-out for the main drain in the corner.  We'll now be able to have our freestanding shelving on the wall behind the tub (where the cement board is leaning), which will free up the walkway to get to the toilet.  We also decided to place the sink directly across from the toilet in order to keep that walkway clear.  I think it will feel more spacious if there is a fairly large area of open space around the tub.  We'll do a mock-up of the layout before moving the plumbing, just to be sure, but I feel confident that it will work well as it was one of the layouts I had seriously considered before.  I had discarded the idea because we'd have to either rip out the floor or kitchen ceiling in order to move the plumbing.  But since the ceiling is already open...  It's not an issue anymore.

Anyhoo...  Tomorrow T will frame the soffit and possibly start on the tiling for the tub surround.  He may also start laying the cement board for the floor, but I'm a little fuzzy on the exact order of things now that we have a working shower again!

2/13/2012

Bathroom remodel : Day 4 - The real work begins

I meant to post every day, but the little guy got sick, so I was spending most of my time trying to distract him from how miserable he was.  We were up every hour all night, in spite of him sleeping in bed with me.  That did help him not to cry when he woke up, but he was tossing and turning enough to keep waking me up.  In spite of that, we have made some progress.

On Saturday, Shayne ripped up the floor.  Miracle of miracles, there was no plywood, so we just had the hardboard to tear out.  That was easy, since it breaks off in chunks.  We found a little more water damage, but that wasn't a big surprise.  The boards were really creaky, though, so we put down plywood near the toilet to walk on.  I didn't want to end up falling into the kitchen.  And I put a nightlight in there for my midnight trips to the potty.  We keep a small light on in the kitchen overnight, and it was just too creepy to see the light shining up between the floorboards and into the pitch black bathroom.

Sunday I tackled the wallpaper.  And, like every other room in the house, the m$&*@r f@$%ing PPOs put up wallpaper, painted it, and then put up even more.  3 layers over the painted layer, which was of course put directly onto the unprimed drywall.  It's an absolute BEAST to get off, worse even than the living room.  Thankfully I only need to get 2 small walls done, but I was hoping to be done yesterday.  Yeah, that didn't happen.  I think that we probably will end up pulling down the bit of remaining drywall.  The bottom is really crumbly, and we're discussing with T (our contractor) whether or not it's worth the effort.  My idea of skimming the original plaster may yet happen...

Here are a few pics from the weekend:

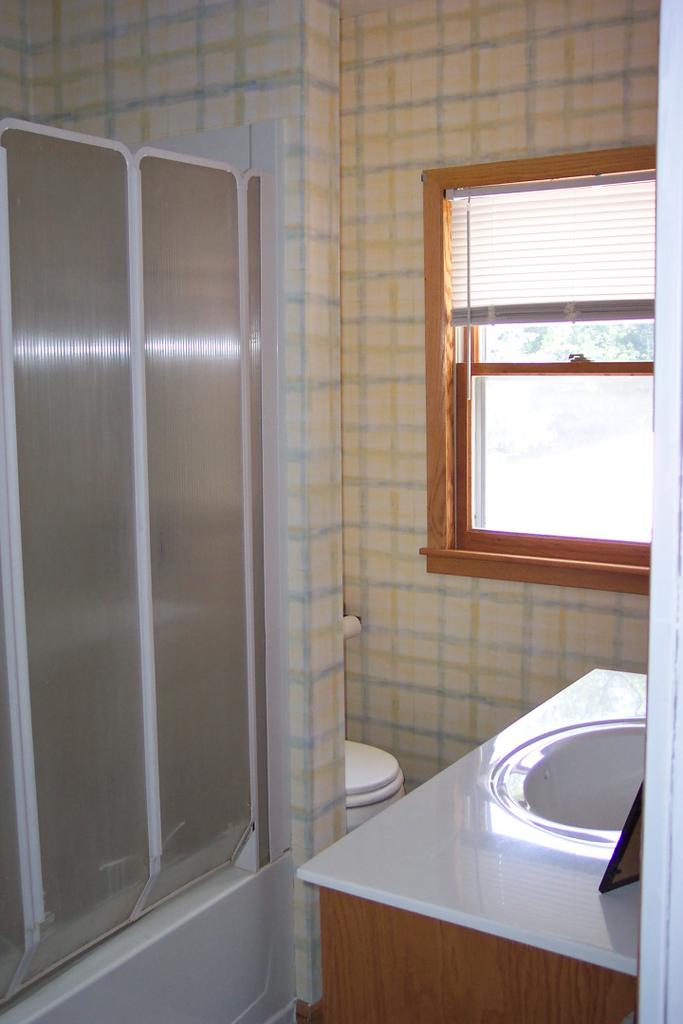
Water damage around the toilet.  I love how you can see daylight through the floorboards.  Yeek!

Overall, the floor wasn't in bad shape.  The only damage was by the toilet.  I think there must have been a cabinet of some sort in the corner, as the floorboards are all wonky and there are paint shadows on the wall...

This morning, T showed up and ripped out the tub and surround.  I think the sound of that cheap, horrible tub being sawed into pieces was one of the most beautiful things I've ever heard.  T is my hero.  Underneath we found some lovely plastic tiles from a '50s remodel:


And once the tub was chopped up and removed, we got to see what was holding it up.  Sorry for the blurry pic, but all of the lumber was pressure-treated decking.  It wasn't even nailed or screwed together, just stacked up for the tub to rest on.  And it was just on the one side.  It's a miracle that tub stayed up and didn't fall off its little pillar.  No wonder it always felt flimsy and we couldn't get caulk to stay put!  But, there was no water damage anywhere.  Yay!


Here we are all cleaned up. T removed all of the loose flooring as well as the scary deck scraps.  He'll patch with plywood once the plumbing is squared away.  We're moving the tub over a few inches so that there's more room by the toilet.


Behind the cabinet next to the tub, we "found" the original attic access.  I knew it was there, but I thought it was in the ceiling.  I also thought it would be less... cute.  Okay, so maybe "cute" isn't the right word, but it definitely had more character than the hole in the ceiling I was expecting.  T was awesome and pulled the frame and door off completely intact.  I may reuse it in the kitchen for a spice cabinet.  If I can get all that glue off.  Thank you again, K, for all of your wonderful work on this house...  :(
I had to leave to go to work, but Shayne says that as of 4:30 the new tub is in the bathroom!  More to come...

2/12/2012

People who paint over wallpaper...

...deserve their owns special place in Hell.


That is all.

2/10/2012

Bathroom remodel: Day 1 - demolition

What a long day.  I feel bad saying this, as Shayne did pretty much all of the work.  I made a trip to Lowes and picked up all of our fixtures and most of the tile.  I also helped clean up.  Shayne took care of all the physical labor and got the project rolling.

Thanks to him, the bathroom remodel has started with a day of demolition.  We are very conservative about what we remove, and we try to save the original whenever possible and practical.  Out of the 4 walls, a floor, and a ceiling in the bathroom, we took one wall down to the studs.  We are leaving the others alone, as they are in good condition.  Sadly, they are sheetrock over the plaster.  I had contemplated ripping out the sheetrock only, then repairing the plaster underneath.  But in the end, I couldn't find a compelling reason for the extra work.  The sheetrock, while obviously not original, is in good shape.  It would be wasteful to rip it out just because I'd prefer plaster.  The wall that we did remove will house the new water supply lines for the sink.  It also had the electrical in it, which (as expected) was not up to code.  K, the PPO, had jury-rigged the GFCI outlets.  We found a junction box in the wall where it was just directly hooked to the old knob and tube.  I was disappointed that the man hadn't properly wired a room he had remodeled, but not at all surprised.  Par for the course; we've seen enough of his "handiwork" by now to know what to expect.

In addition to his incompetence at wiring, K was also not so great with drywall.  He only put up sheetrock in the places that would be visible, so there was none behind the vanity or the floor-to-ceiling cabinet in the corner.  Not even on the ceiling.  That man was a cheapskate!  I'm expecting that we'll find the same thing behind the shower and adjoining cabinet when we remove it on Monday.

While today was really productive, I also found it really demoralizing.  I know that demo is the low point because you are taking something that is functional, though not particularly attractive, and making it ugly and temporarily useless.  I know that the bathroom I've envisioned for YEARS now is finally on its way to appearing in my house.  I know that in 2 weeks, we'll be just about finished, since we're hiring someone else to do the work instead of learning as we go and slogging our way through on sheer willpower.  But after we demo (and by "demo" I mean everything from ripping up carpet to tearing down walls), I get this overwhelming feeling of, "Oh shit, what did we just do?"  I'm not energized or excited to be starting.  I'm mentally tired and sad.  This is the point where I can't see the finished product and just wonder how in the heck it's all going to work out.  But it will.  It always does.  But I don't know many people who would be excited to have a bathroom that looks like this (though at least now the dust has settled!):

Note how the drywall doesn't extend much past the window...  Also the layers of flooring: linoleum over hardboard over plywood.  Awesome.

See the hanging junction box where the new wire connects to the old knob and tube?  The new PVC is our work from last summer, which is why the other side of the wall is open as well.
Here's what we started with:

The angle isn't the same, so you can't see the HUGE floor-to-ceiling corner cabinet
I will say this: having the corner cabinet and clunky vanity gone has made the room seem so much bigger.  Obviously, it looks like hell right now, but I feel like we knocked out a wall or something.  It's that dramatic.

Stay tuned for more tomorrow, after we remove the hardboard and plywood underlayment.