Shayne picked up the sander from the rental place and deposited it in the living room. After showing me how to load the paper, he left for work. Alone with the scary machine, I warily turned it on. Loud, but no problems. I started to slowly push it forward while rocking it down to contact the floor. Disaster. The second the drum hit the floor, the sandpaper exploded and flew everywhere. I quickly turned off the machine and went to assess the damage. The floor was a little shredded, but since I was moving, it was a line and not a gouge. I got a new sheet of paper, reloaded, and tried again. This time, I moved about 12" before the paper exploded off the drum. Since I was already afraid of the drum sander (due to the horror stories I'd heard about it runnning away and ruining floors), the fact that it kept exploding at me only made matters worse. My floors were ruined, the sander wouldn't work, and I'd have to get wall-to-wall carpet to hide my damage. In light of those revelations, I did what any self-respecting, modern woman would do: I burst into tears of frustration and went to hide upstairs.
I came back down about 30 minutes later, after reading about the SL-8 sander on the internet. Supposedly, if the cams that hold the paper are not tight enough, the paper will break. I gingerly loaded another sheet of 36 grit paper, tightened the cams fully, put in earplugs, and turned the sander on. The Exploding Paper Monster was vanquished, and a purring tiger was left in its place.
I had heard horror stories about gouged floors and uncontrollable sanders, and I feel obligated to say that, if you use it properly, it's very easy to use and control. Aside from my paper explosions, which were completely preventable, the sander is a tame beast. It doesn't pull like I expected (I could contol it with one hand, even though I used 2), and the only gouge I got was when I sneezed with the sander moving along the floor. It hardly uses any sandpaper at all compared to the EZ-V. I used 6 sheets for the whole room, including the 2 that I ruined. Total rental cost was under $50. Guess what sander I'll be using next time?
After sanding, I wiped down the floor with mineral spirits and prepared to re-shellac. This time, I used a thinned down coat of clear, and I only applied it to 9 boards in case it was horrible. I applied it to 3 boards at a time, moving with the grain, and coating the whole board at one time. Here are the results:
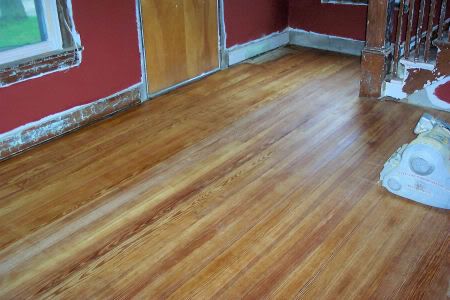
The 9 shellacked boards are little darker than the natural wood, but not too much. The color variation is due to the floor, not the shellac (thank God!). I'll still be adding a coat or two of amber over it, but it's a nice start...
3 comments:
Wow, the floors look great. I was happy to read your post about the drum sander since I have also heard the same horror stories. We have so many rooms to do I now feel more emcouraged. Thanks!!!
The drum sander is so much less scary than I'd believed from the horror stories... You still have to use it with care, especially on the lowest grit papers (36 was low enough for me!), but unless you bump it down hard or let it sit in one place, nothing bad will happen to you.
Thanks for detailed post on the sander. Our PO's gouged the heck out of the dining room floor, and I was afraid of the drum sander. But now I know that the damage must've been from user error. Next weekend we're sanding and shellacking our family room. I hope it comes out as nice as your floor.
Post a Comment